
by Jay Beale
(This post has a sequel.)
I admit it — I haven’t been purely vacationing during my San Diego PTO. I’ve found particular intellectual joy in figuring out how to hack some of the CTF-type virtual machines from VulnHub. That led to looking through an answer key (also known as a “walkthrough”) for one and wanting to publish an attack-defense hybrid walk-through, showing how to attack the machine, but also break each stage of the attack.
Spoilers Ahead! If you want to attack the Mr. Robot virtual machine on VulnHub, please come back and read this afterward.
The Mr Robot vulnerable virtual machine’s author got creative with his story tie-in. Take a look at the first screen you see when you find the web application listening on port 80:

In this blog post, I’ll take you through the attack on this capture-the-flag-style system and then on how you could defend it without stripping out the vulnerabilities.
Attack: Password Spraying the Login Page
Looking at the web server’s robots.txt file grants the first flag, as well as a dictionary file for username and password guessing, called fsocity.dic.

A quick run of dirbuster…
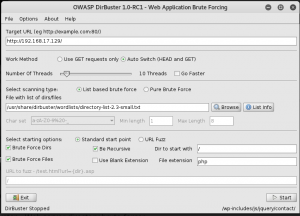
…finds a WordPress login page.
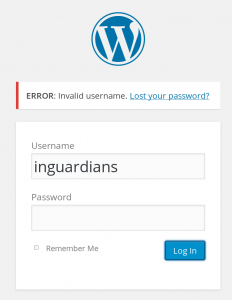
This version of WordPress gives differing messages for non-existent user names versus incorrect passwords, allowing us to brute force to get a correct username.
The fsocity.dic file has a ton of repetition, so we sort and uniq it, pruning it from more than 858,000 lines to under 11,500 lines.
It takes under two minutes to find that the elliot username is valid.
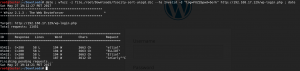
Now, we use wfuzz to try passwords for two and half minutes, when it finds the show’s protagonist’s password, “ER28–0652.”

As my friend Skip Duckwall likes to say, “Winner, winner, chicken dinner!”
I’ve sent a few over 5,500 login attempts to find a user name, then about the same number to find that user’s password.
Defense: Break Password Sprays with OSSEC’s iptables Active Response
This is the first point where my defender’s mind just wants to scream, “Why the heck did you let me send tens of thousands of login attempts?!” Let’s use OSSEC to break that pair of brute forcing attacks. Mike Poor introduced me to OSSEC about five years ago. It’s a powerful detection tool, combining four major functions:
- Alerting on log messages
- File integrity checking
- Detecting rootkits
- Taking action, including firewall black holing, disabling accounts, and null routing
I teach OSSEC in the newer versions of the Linux Lockdown classes that I’ve been giving since 2001 at conferences like Black Hat, CanSecWest, and RSA and in private corporate trainings. (Here’s a link to this year’s Black Hat class.) OSSEC is a good fit here for adding some quick rate limiting to a login page. Let’s break this password spray by installing OSSEC and creating a rule that triggers an iptables DROP rule whenever an attacker tries to login more than, say, twenty (20) times in ten (10) minutes from the same IP address. I note a couple caveats to this approach at the end of this post.
Here’s what we’ll do next:
- Install OSSEC.
- Configure OSSEC to watch the Apache web server log file.
- Find or create a decoder (first pass log parser) to read web server log lines.
- Find or create a rule to detect WordPress login attempts.
- Configure OSSEC to activate a firewall drop rule.
- Verify effectiveness.
Let’s start with that installation.
Step 1: Install OSSEC
Before installing OSSEC, I used the rest of the attack (covered in this post’s sequel) to get an account on the system, grant it sudo access, and install SSH on the system. Then I downloaded OSSEC from https://ossec.github.io/ and compiled it like so.
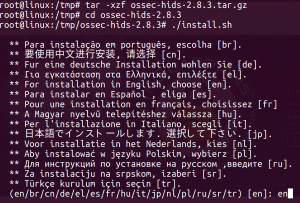
First, uncompress the tarball and run the install.sh script. Select your language:
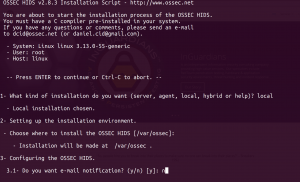
Next, hit enter to being answering questions. Choose the “local” installation type, since we’re just applying this to one system:
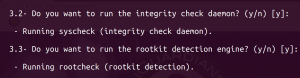
Choose whether you’d like integrity checking and rootkit detection turned on:
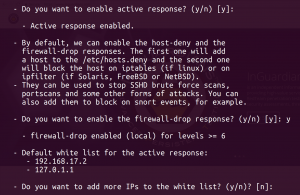
Choose to enable active response, with its firewall drop script:
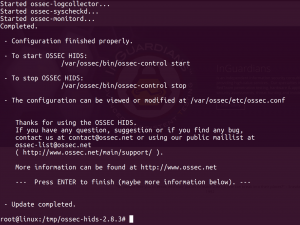
Now hit enter one more time to end the installation:
We see the commands to start OSSEC below. Note that the entire installation happens in /var/ossec:
Step 2: Configure OSSEC to watch the Apache log file
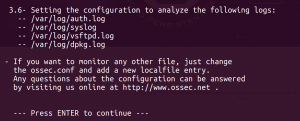
We’ve now got OSSEC installed. Let’s tell it what log files to watch for web server requests. The Mr. Robot CTF is based on Ubuntu 14.04 LTS, so we’ll want to watch files in /var/log/apache2/.
We’ll add this to the end of the /var/ossec/etc/ossec.conf file, just before the </ossec_config> line:
  <!-- 201705xx JJB – tell OSSEC to watch Apache log files -->
  <localfile>
    <log_format>syslog</log_format>
    <location>/opt/bitnami/apache2/logs/access_log</location>
  </localfile>
Step 3: Find or Create a Decoder to Read Apache Log Lines
Next, we need to make sure OSSEC will know how to decode an Apache access log. Here’s the kind of line we’re looking for:
10.0.0.178 - - [13/Nov/2015:01:22:19 +0000] "POST /wp-login.php HTTP/1.1" 302 -
Let’s look in OSSEC’s etc/decoder.xml file, which tells OSSEC how to do its first pass parsing on log files, grouping them into program types and extracting a few items, like IP addresses and URL’s. Scanning through, we find there’s a decoder already created for this:
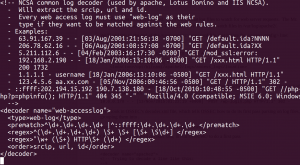
This will work for the Apache httpd server, as well as for many others. So, if we create rules that specify “web-accesslog,” we’ll match against items in a web server access log. Now we need to find or create a rule to match WordPress login attempts.
Step 4: Find or Create a Rule to Detect WordPress login Attempts
It turns out there’s already a rule in place that notes WordPress attacks. It was pretty easy to find. I’d like to say that I found it by running a grep on /var/ossec/rules/*, but that’s not what happened. I created my own rule, tested it, and found that a OSSEC already shipped with this rule:
  <!-- WordPress wp-login.php brute force -->
  <rule id="31509" level="3">
    <if_sid>31108</if_sid>
    <url>wp-login.php|/administrator</url>
    <regex>] "POST \S+wp-login.php| "POST /administrator</regex>
    <description>CMS (WordPress or Joomla) login attempt.</description>
  </rule>
Now, we need to create a rule that alerts only if this rule (31509) fires more often than, say, 5 times in 1 minute. I was about to write my own, but found that the very next rule in the same rule file does exactly this, but with different thresholds:
  <!-- If we see frequent wp-login POST's, it is likely a bot. -->
  <rule id="31510" level="8" frequency="6" timeframe="30">
    <if_matched_sid>31509</if_matched_sid>
    <same_source_ip />
    <description>CMS (WordPress or Joomla) brute force attempt.</description>
  </rule>
Let’s tweak the thresholds. OSSEC has a counterintuitive way of counting. To say that we want to trigger the higher priority rule (31510) when the number of alerts on rule 31509 exceeds 20 in 10 minutes, we have to change that line to:
<rule id="31510" level="8" frequency="18" timeframe="10">
I can’t say why, as I haven’t sat down to read the source code, but the documentation is clear on this:
“[frequency] Specifies the number of times the rule must have matched before firing. The
number that triggers the rule is actually 2 more than this setting.”
OK. We’ve got a rule that fires once we get 20 attempts on wp-login.php in ten minutes. Let’s tell OSSEC to block the IP address for 10 minutes each time this rule gets triggered.
Step 5: Configure OSSEC to Activate a firewall drop rule
We open up etc/ossec.conf and find the active response sections. By default, the firewall drop action is set to trigger on any rule that has severity/priority of 6 or higher. We’d like to be more targeted, just applying it to one specific rule. We comment out the <level> block and replace it with a <rules_id> block, naming our rule:
  <active-response>
    <!-- Firewall Drop response. Block the IP for
       - 600 seconds on the firewall (iptables,
       - ipfilter, etc).
      -->
    <command>firewall-drop</command>
    <location>local</location>
	<!--    <level>6</level> -->
    <rules_id>31510</rules_id>
    <timeout>600</timeout>
  </active-response>
Step 6: Verify Effectiveness
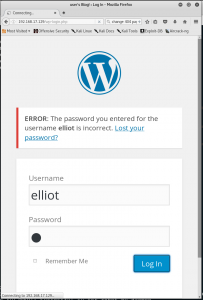
Now let’s try 21 login attempts on WordPress. On the 21st attempt, our browser stops being able to connect to the target system. Note the “Connecting…” in the tab name and bottom left of the browser — the browser is stuck unable to connect for 5 minutes.
Here’s what happens in the iptables firewall:
iptables -A INPUT -s 192.168.17.134/32 -j DROP
And here’s what we find in the OSSEC active response log:
/var/ossec/logs # cat active-responses.log
Thu May 25 02:11:54 UTC 2017 /var/ossec/active-response/bin/host-deny.sh
    add - 192.168.17.130 1495678314.2468 31510
Thu May 25 02:14:08 UTC 2017 /var/ossec/active-response/bin/host-deny.sh
    delete - 192.168.17.130 1495678314.2468 31510
This was only a five minute delay, but that’s enough to make a password spray start to take painfully long. More powerfully, OSSEC can let us make the firewall rule period last increasingly longer. If we add a <repeated offenders> directive to the <active-response> firewall section, so it reads as below, our attacker will have a five minute blacklist period the next time he starts, then a one hour blacklist period, and then a one day blacklist period. That’s certainly enough to cripple a password spray.
<active-response>
<command>firewall-drop</command>
 <location>local</location>
<rules_id>31510</rule_id>
 <timeout>600</timeout>
<repeated_offenders>600,3600,86400
</repeated_offenders>
 </active-response>
In the sequel to this blog post, I’ll walk through the rest of the Mr Robot CTF and show how we can break the next two stages of the attack with AppArmor and file permissions.
If you liked the theme of this post, please let me know. Find me on twitter at @jaybeale.
 Jay Beale has created several defensive security tools, including Bastille Linux/UNIX and the CIS Linux Scoring Tool, both of which were used widely throughout industry and government. He has served as an invited speaker at many industry and government conferences, a columnist for Information Security Magazine, SecurityPortal and SecurityFocus, and a contributor to nine books, including those in his Open Source Security Series and the “Stealing the Network” series. He has led training classes on Linux Hardening and other topics at Black Hat, CanSecWest, RSA, and IDG conferences, as well as in private corporate training. Jay is a co-founder, Chief Operating Officer and CTO of the information security consulting company InGuardians.
Caveat 1: Transparent Proxies
This works fairly well if you have a WordPress site where only a few people will be logging in at once. If you have a busy login page for a well known public property (Reddit comes to mind), it’s really likely that you’ll have multiple users coming through a single transparent proxy. At this point, the approach still works – it’s just more nuanced. For example, you can investigate what your normal number of login attempts are per unique IP and set your thresholds accordingly. Additionally, you could create a different rule, with a different triggering ratio, for the popular transparent proxies. In both of these cases, you could examine logs to build up those statistics, modifying your instrumentation as you need. At the end of the day, we could break this password spray if we set it to block an IP only once it had made 50 login attempts in the space of 5 minutes.
Caveat 2: Other Approaches
There are WordPress modules that can do account lockout, like Login Lockdown (https://wordpress.org/plugins/login-lockdown/). For this post, I chose OSSEC over adding a module to WordPress because it generalizes, demonstrating how you can defeat a password spray even when you cannot modify the web application you’re protecting.
There are also plenty of web application firewalls (WAFs), including the open source ModSecurity (https://modsecurity.org/) that I cover in my Linux lockdown classes. I chose OSSEC over a WAF here because OSSEC is quite a bit simpler. That said, I strongly recommend putting a WAF in front of every web application.