
Original Post Author: Don C. Weber [Twitter: @cutaway]
Original Date Published: 15 Oct 2013
Many people think RfCat is a very cool concept. The thought of monitoring and interacting with sub-gigahertz radio is very sexy. Hell, it IS sexy. Then people get an IM-ME, a CC1111EMK, or a ToorCon 14 badge and they start using it and quickly realize that RfCat is not for the faint of heart. It is complex, only moderately documented, and you still need to understand about radios to be able to use it. However, once you do begin to understand radio configuration and manipulation, the ease of use and extensibility of RfCat becomes very apparent.
To help people who want to use RfCat, we decided to tell you how we have been using it lately. We will outline, as best we can, the steps we have taken to get RfCat to capture and attempt communications with an insulin pump and remote that we acquired. We will show you how we obtained our RfCat settings, how this lead to packet capture and analysis, how we leveraged the captured data to conduct replay attacks, and how we maintain our configuration settings for future analysis efforts.
We will admit to you before we start that we haven’t successfully communicated with either of these devices. That is how hardware and radio research goes. You have a breakthrough and then you have periods of stagnation and trying things every which way until you have another breakthrough. We mention this because if you are using RfCat for radio analysis, prepare for both. Research is hard. RfCat makes it a little easier.
When you start RfCat you are greeted by the following help message.
‘RfCat, the greatest thing since Frequency Hopping!’
Research Mode: enjoy the raw power of rflib
currently your environment has an object called “d” for dongle. this is how
you interact with the rfcat dongle:
>>> d.ping()
>>> d.setFreq(433000000)
>>> d.setMdmModulation(MOD_ASK_OOK)
>>> d.makePktFLEN(250)
>>> d.RFxmit(“HALLO”)
>>> d.RFrecv()
>>> print d.reprRadioConfig()
In [1]:
The commands provided here are helpful and usable, but only if you are running RfCat the first time. These commands do not get you working on assessing radio communications. For that you need to understand radio configurations and how to gather that information for a specific device. We don’t have time to explain radio configuration, for that you should consider taking a radio class from Mike Ossmann.
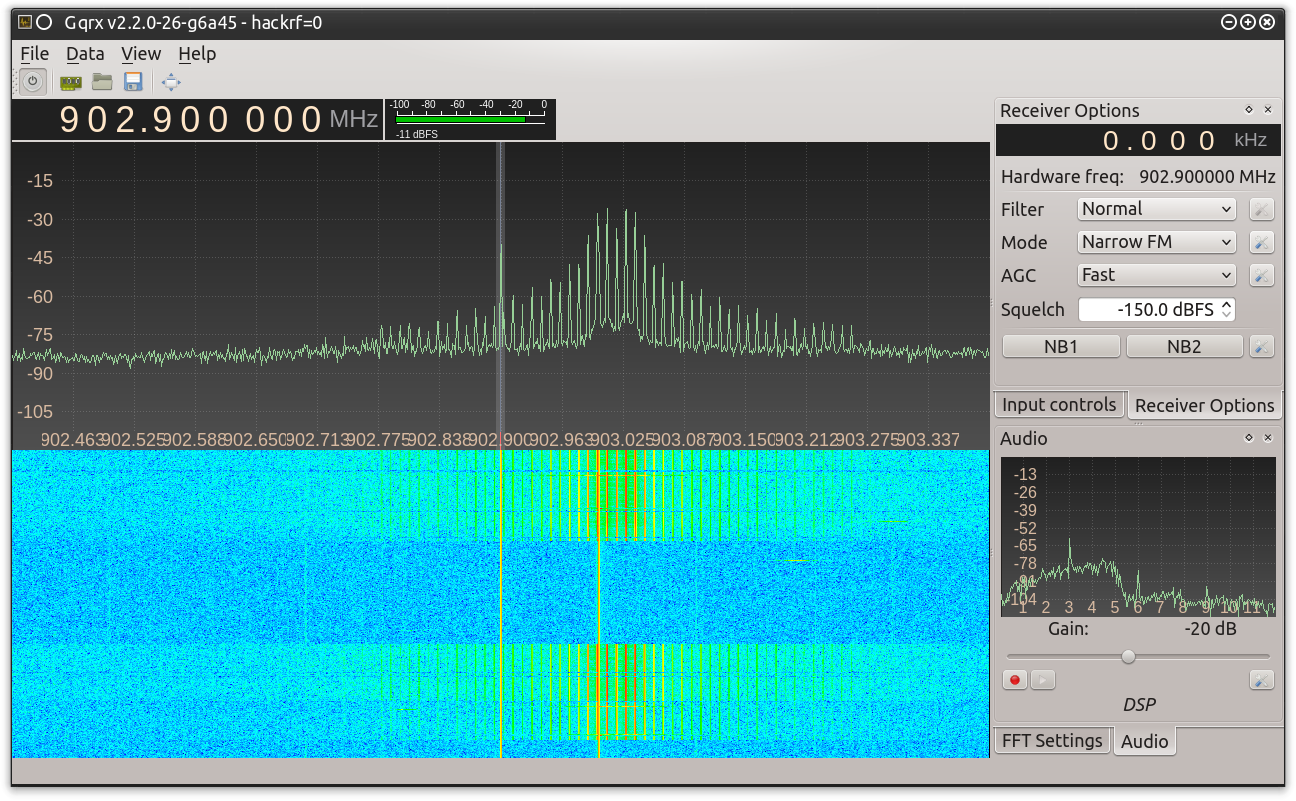
Just like any other radio device research, we located the identification numbers for the insulin pump and remote and obtained the Federal Communications Commission (FCC) testing and user manual documentation for each device. From these documents we extracted the relevant data such as operation frequencies and modulation. In this instance we determined that the radio would operate on 903 MHz using Frequency Shift Modulation (FSK). To confirm this information we leveraged a HackRF and the Gqrx Software-Defined Radio (SDR) spectrum analyzer (although any RTL-SDR module and spectrum analyzer combination will work) to capture a transmission from the insulin pump’s remote (see Figure 0x0). The wave patterned that occurred at the moment we turned on the remote confirmed these configurations.
Other relevant radio configuration information can be ascertained by analyzing the Inphase and Quadrature (I/Q) data captured by HackRF. However, analysis this data can be a long, laborious, and difficult process and it will result in educated guesses rather than specific values. Fortunately, as atlas and Don C. Weber have explained before, there are other methods to obtain this specific information. The hardware configuration of the insulin pump remote allowed us to leverage these techniques.
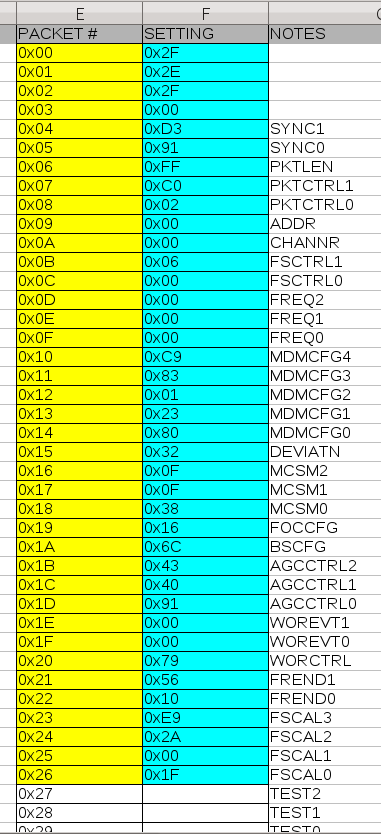
We then popped the insulin remote open and extracted the radio configuration by tapping the pins between the remote device’s microcontroller and the Chipcon CC1101 radio. Using a Saleae Logic Analyzer we retrieved the radio configuration bytes that the microcontroller sent to the radio to initiate its operation. Leveraging Saleae’s built-in Serial Peripheral Interface Bus (SPI) analyzer, we exported this information to a Comma Separate Value (CSV) file for easy reference and use (see Figure 0x1).
Now, we could use these values to configure RfCat if we wanted to do so.
Help on method setRFRegister in module rflib.cc1111client:
setRFRegister(self, regaddr, value, suppress=False) method of rflib.RfCat instance
set the radio register ‘regaddr’ to ‘value’ (first setting RF state to IDLE, then returning to RX/TX)
value is always considered a 1-byte value
if ‘suppress’ the radio state (RX/TX/IDLE) is not modified
The problem is that these values are specific to the CC1101 Radio. If you used these values to set the CC1111EMK, you would get slightly, and perhaps drastically, different results. The primary issue is that the CC1101 operates with a 26 MHz clock while the CC1111EMK is configured with a 24 MHz clock. When the radio takes these values and computes the radio settings they will be different enough that the radios will not communicate.
We could do a bunch of math to determine these values ourselves (and there is probably a way to use RfCat to do so), or we can do what developers do and plug these values into Texas Instruments’ (TI) SmartRF Studio. SmartRF Studio has a “Register View” for each of the Chipcon radios it supports. With a little deductive reasoning we can determine which values belong to which registers (as labeled in Figure 0x2). We plug these values into the “Register View” (skipping the 0x00 values in this instance) (see Figure 0x2) and the values in the “RF Parameter” window (see Figure 0x3) are changed to the radio’s configuration. These are the values that we are going to use to configure RfCat.
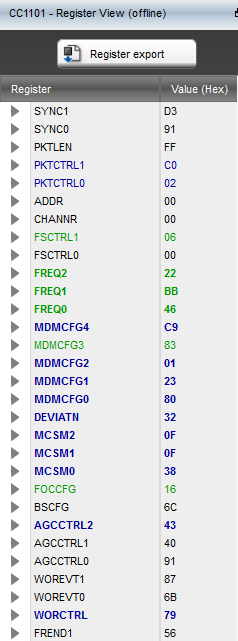
Figure 0x2: SmartRF Studio CC1101 Register View
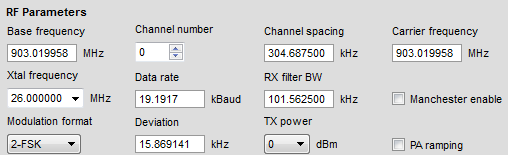
Figure 0x3: SmartRF Studio CC1101 RF Parameters
We made the following configuration changes to RfCat using these SmartRF Studio outputs:
- d.setFreq(903.02e6) – frequency discovered via FCC document review and verified via software-defined radio analysis
- d.setMdmModulation(MOD_2FSK) – modulation discovered via FCC document review and verified via software-defined radio analysis
- d.setMdmSyncWord(0xd391) – default value from SYNC0 and SYNC1 register values (see Figure 0x2)
- d.setMdmDeviatn(15869.141) – Deviation from RF Parameter results
- d.setMdmChanSpc(199951.172) – Channel spacing from RF Parameter results
- d.setMdmChanBW(101562.5) – RX filter BW from RF Parameter results
- d.setMdmDRate(19191.7) – Data rate from RF Parameter results
- d.makePktFLEN(0xff) – packet length set large enough for data analysis
All of these settings are important for listening and interacting with another radio. Other than the frequency and modulation, the most important setting, in our opinion, is the data rate. Basically, data rate is the symbols per second or baud rate. Remember, this radio is demodulating the signal and outputting the data contained in this information. If you provide the wrong baud rate, you might have captured the data, the radio is going to interpret the bytes incorrectly. The radio can only do what you tell it to do.
Next you want to check to be sure that the radio configured itself correctly using d.printRadioConfig() and reviewing the settings.
== Hardware ==
Dongle: DONSDONGLE
Firmware rev: 0232
Bootloader: CC-Bootloader
== Software ==
rflib rev: 277
== Frequency Configuration ==
Frequency: 903019775.390625 hz (0x25a036L)
Channel: 0
Intermediate freq: 281250 hz
Frequency Offset: 0 +/-
== Modem Configuration ==
Modulation: 2FSK
DRate: 19180.297852 hz
ChanBW: 107142.857143 hz
DEVIATION: 16113.281250 hz
Sync Mode: 15 of 16 bits must match
Min TX Preamble: 4 bytes
Chan Spacing: 199951.171875 hz
BSLimit: No data rate offset compensation performed
DC Filter: enabled
Manchester Encoding: disabled
Fwd Err Correct: disabled
== Packet Configuration ==
Sync Word: 0xD391
Packet Length: 255
Length Config: Fixed Packet Mode
Configured Address: 0x0
Preamble Quality Threshold: 4 * 2
Append Status: No
Rcvd Packet Check: No address check
Data Whitening: off
Packet Format: Normal mode
CRC: disabled
== AES Crypto Configuration ==
AES Mode: CBC – Cipher Block Chaining
Crypt RF Input: off
Crypt RF Output: off
== Radio Test Signal Configuration ==
TEST2: 0x88
TEST1: 0x31
TEST0: 0x9
VCO_SEL_CAL_EN: 0x0
== Radio State ==
MARCSTATE: MARC_STATE_RX (d)
DONGLE RESPONDING: mode :d, last error# 1
[snipped for relevance]
With the radio configured we are ready to start grabbing data as it is transmitted by one of our devices. Using the d.RFrecv() command will capture one packet at a time and display it in raw format. The output of this command is useful, but only slightly. Since RfCat leverages the ipython interactive environment a user might try to use a while loop to run d.RFrecv() over and over. While this is an option it will most likely end with a USB timeout error if there is nothing to receive. A better method is to use the d.RFlisten() command. This will continuously grab data transmissions and display them in HEX and ASCII format. Pressing Enter will cleanly stop this command and get the user back to the interactive shell. The following data is what we received from the insulin pump remote. Non-relevant packets have been removed.
Entering RFlisten mode… packets arriving will be displayed on the screen
(press Enter to stop)(1380640671.097) Received: 2e000e009b193f685000a70e980d0000a50d903a000000000000
00000000000000000000000000000000000000000000000000000000000000000000000000000000
0000000000000000000000004f403155d5555555555555555577777fffffffffffffffffffffffff
fffffffffffffebaaaaaaaaaaaaaaaaaaaaaaaaaaaaaaaaaaaaaaaaaaaaaaaaaaaaaaaaaaaaaaaaa
aaaaaaaad3910300f10464b6c3952c010000a92ae302a50d903a0000000000000000000000000000
00000000000000000000000000000000000000000000000000000000000000000000000000000000
0000000069f38faf34a19f0fac7cf656a7ed9df00f2f7181aca74b8213 | ……?hP………
.:………………………………………………….O@1U.UUUUUUUUww…..
………………………………………………….d…,….*…..:……
…………………………………………….i…4….|.V…../q…K..(1380640671.530) Received: 0300f800b7f2ccbe2c010000a92ae302a50d903a000000000000
00000000000000000000000000000000000000000000000000000000000000000000000000000000
0000000000000000000004005570b842aaaaaaaaaaaaaaaaaaaaaaaaaaaaaaaaaaaaaaaaaaaaaaaa
aaaaaaaaaaaaaaaaaaaaaaaaaaaaaaaaaaaaaaaaaaaaaaaaaaaaaaaaaaaaaaaaaaaad39103000704
fa79a0cf2c010000a92ae302a50d903a000000000000000000000000000000000000000000000000
00000000000000000000000000000000000000000000000000000000000000000000199a5e98c32b
ee5016da4e6fffb37f8a1b3d66d84715df483ff7cb871d4ae82404732c | ……..,….*….
.:………………………………………………….Up.B…………….
………………………………………….y..,….*…..:…………….
……………………………………..^..+.P..No…..=f.G..H?….J.$.s,
These packets were selected specifically because they demonstrate several key concepts that users of RfCat have to keep in mind. First, the radio is going to listen for a preamble to determine when another radio is transmitting. The preamble is a tranmission changing from high to low at the appropriate speed. When looking at packet captures this preamble will be represented as a continuous string of “aa” or “55” characters.
Out[10]: ‘0b10101010’In [11]: bin(0x55)
Out[11]: ‘0b1010101’
After the preamble the transmitting radio is going to send the syncword. Syncwords are leveraged to distinguish between radio networks and the beginning of packet data. In this case the syncword is 0xd391 (NOTE: this is the default for most Chipcon radios). However, the radio naturally strips the preamble and syncword off of the packet as it is really not a part of the data packet. After demodulation, the radio only returns the packet as specified by the packet length. What the data above shows is that by setting the largest packet length we can see the preamble and the sycnword. In reality this is a separate packet. The radio is just processing the information in the manner it is configured. Therefore, the second data transmission has two packets in it.
00000000000000000000000000000000000000000000000000000000000000000000000004005570
b84203000704fa79a0cf2c010000a92ae302a50d903a0000000000000000000000000000000000000000
0000000000000000000000000000000000000000000000000000000000000000000000000000199a
5e98c32bee5016da4e6fffb37f8a1b3d66d84715df483ff7cb871d4ae82404732c
From this we can start making assumptions about the data being transmitted by the insulin pump remote. Firstly, we can start to estimate the actual packet size. The first packet gives us a possible maximum packet length and the second packet shows that some of the data at the end of each packet might just be garbage the radio interpreted as data. Capturing more packets and comparing the packets may lead us to determining if the data contains a byte that represents a packet length. If no packet length byte is detected it might mean that the device only sends packets of a specific length. Additional validation for not having a packet length byte is padding such as the 0x00 bytes at the end of these packets.
The 0x00 bytes at the end of each packet also provide us with another key piece of information about these transmissions. Data whitening is a technique used to improve radio transmissions. Its implementation also obfuscates the actual data being transmitted. Data transformed using data whitening will seem random and there will be no long bit runs, such as 0x0000 and 0xFFFF, as these are purposely avoided. The 0x00’s in these packets demonstrates that we do not need to run through a data whitening algorithm to obtain the actual data. Additionally, consistent packet contents over multiple transmissions indicates the data represented in the packet is not transformed by another process after the radio passes off the information because the contents would be more random.
Using this information we scaled back the packet length that RfCat was using to 82 bytes. We selected 82 because the data is in human readable format and ’03’ (the first byte of the data) is actually the single byte 0x03 or ‘x03’ as it is being transmitted.
00000000000000000000000000000000000000000000000000000000000000000000000000000000
00000000004005570b842’In [13]: len(data) / 2
Out[13]: 82
Running d.RFlisten() now provides us with very usable and readable data from each transmission. Smaller packets actually make it easier to compare incoming data visually.
Entering RFlisten mode… packets arriving will be displayed on the screen
(press Enter to stop)(1380827382.380) Received: 0300f10464b6c3952c010000a92ae3027539884d000000000000
00000000000000000000000000000000000000000000000000000000000000000000000000000000
0000000000000000000000000834b55b | ….d…,….*..u9.M……………………
……………………………..4.[(1380827382.750) Received: 0300f800b7f2ccbe2c010000a92ae3027539884d000000000000
00000000000000000000000000000000000000000000000000000000000000000000000000000000
000000000000000000000c0072f9b35d | ……..,….*..u9.M……………………
…………………………….r..]
Armed with this information, we are able to analyze the captured data packets to determine the communication protocol used to pass data between these two devices. This is a very manual process that includes documenting specific actions and mapping them to the specific packets the actions generated. However, we don’t always need to completely understand the communication protocol to continue with radio analysis. RfCat gives us the ability to transmit packets as well. If done properly, the packet from one device should elicit a response from the other device. Depending on the implementation, this might require us to transmit one packet or a series of packets in a specific order.
Data transmission for replay analysis requires a few things. First, we have to set up another system running another instance of RfCat. This will be our listening station that helps us by monitoring our RfCat transmissions and for responses from our targets. Monitoring our own transmission is very important as we can confirm we are sending the data in the same manner as the device we are mimicking.
Another requirement for data transmission is passing the d.RFtxmit function data in a format that it will transmit properly. This function will transmit data exactly as it is passed. Running d.RFtxmit(‘0300’) will transmit data that looks like “30333030” instead of transmitting corectly formated data which is “x03x00”. Therefore, if we want to copy and paste the data we captured we need to transform it from its ASCII representation to its byte representation. Luckily, we are working within an interactive python shell and we can just write our own function to provide this capability.
….: tmp = ”
….: for e in range(0,len(data),2):
….: tmp += data[e:e+2].decode(‘hex_codec’)
….: return tmp
Now we can start capturing data with d.RFlisten() and wait for the specific packets we want. Once we see them we can stop the radio, cut and paste the packet contents into d.RFtxmit and the packet we want is re-sent.
00000000000000000000000000000000000000000000000000000000000000000000000000000000
000000000000000000000000834b55b’))In [17]: d.RFxmit(str2hex(‘0300f800b7f2ccbe2c010000a92ae3027539884d0000000000000
00000000000000000000000000000000000000000000000000000000000000000000000000000000
00000000000000000000c0072f9b35d’))
We should see these packets transmitted in our second RfCat instance. If we are REALLY lucky we will see a response from one of the devices. Thus far, our replays have not received a response. Next steps will be to try and determine what changes in the packets over time, transmission order, and response timing.
Of course, all of this research did not happen in one sitting. This is a summary of several days of work. As we progressed, we found ourselves repeating configuration steps over and over again. This included plugging the register values into SmartRF Studio. As these values do not change over time, doing this was time consuming and unnecessary. It should be noted that the RfCat radio will maintain its last configuration. However, if we are working on several projects, we will need to modify the radio settings. To ease this configuration process we figured out how to leverage a python script to make these modifications while also providing other custom functionality needed for data analysis and transmission. The following is an example of the script we used to manage our configurations and custom functionality. It shows the power of leveraging your own scripts when working with RfCat for radio analysis.
”’Convert a string to their hex representation”’
tmp = ”
for e in range(0,len(data),2):
# Grab 2 characters and decode them as their hex values
tmp += data[e:e+2].decode(‘hex_codec’)
return tmpMOD_2FSK = 0x0def pump_start(d):
d.setFreq(903.02e6)
d.setMdmModulation(MOD_2FSK)
d.setMdmSyncWord(0xd391)
d.setMdmDeviatn(15869.141)
d.setMdmChanSpc(199951.172)
d.setMdmChanBW(101562.5)
d.setMdmDRate(19191.7)
d.makePktFLEN(82)if __name__ == ‘__main__’:
print “Mainlining not implemented”
Now we just need to process this script when we start RfCat and our radio is configured.
‘RfCat, the greatest thing since Frequency Hopping!’Research Mode: enjoy the raw power of rflibcurrently your environment has an object called “d” for dongle. this is how
you interact with the rfcat dongle:
>>> d.ping()
>>> d.setFreq(433000000)
>>> d.setMdmModulation(MOD_ASK_OOK)
>>> d.makePktFLEN(250)
>>> d.RFxmit(“HALLO”)
>>> d.RFrecv()
>>> print d.reprRadioConfig()In [1]: sys.path.append(‘/home/cutaway/Radio_Analysis/InsulinPump’)In [2]: import insulinpump_resourceIn [3]: insulinpump_resource.pump_start(d)
We are still working on forcing this insulin pump and remote combination to do the things we want. RfCat was a critical tool in getting to this point. Hopefully, our analysis process has helped you understand how to use RfCat to analyze the devices you choose. These concepts are tough to grasp and implement. Understanding them will take time, effort, and experience. At this point, you should now understand some of the important configuration options, how to manipulate them, how to capture and identify data, how to retransmit that data, and how to quickly and consistently configure RfCat for expert radio analysis.
Go forth and do good things.