
Original Post Author: Tom Liston [Twitter: @tliston]
Original Date Published: 11 June 2013
Doing a Google search for “arduino GPS clock” turns up more than a few other projects that use the time information found within the NMEA data provided by a GPS signal to display the current time and date. So… while this is Yet Another Arduino GPS Clock (YAAGC), I hope that some of the additional programming I’ve done will serve to set it apart from the rest. Additionally, my goal in writing this multi-part blog post is to fully document both the process of building the electronics and the development of the software. I hope to give you – the reader – a step-by-step process explaining the development of the hardware and software for this project,
but I also hope to be able to teach you some interesting stuff along the way. For instance – if you don’t know what NMEA data is all about, you’ll learn – I promise.
So, what is it that sets my “Arduino GPS Clock” apart from the myriad of others on the ‘net? Well, I started off with the basics that any of these projects have:
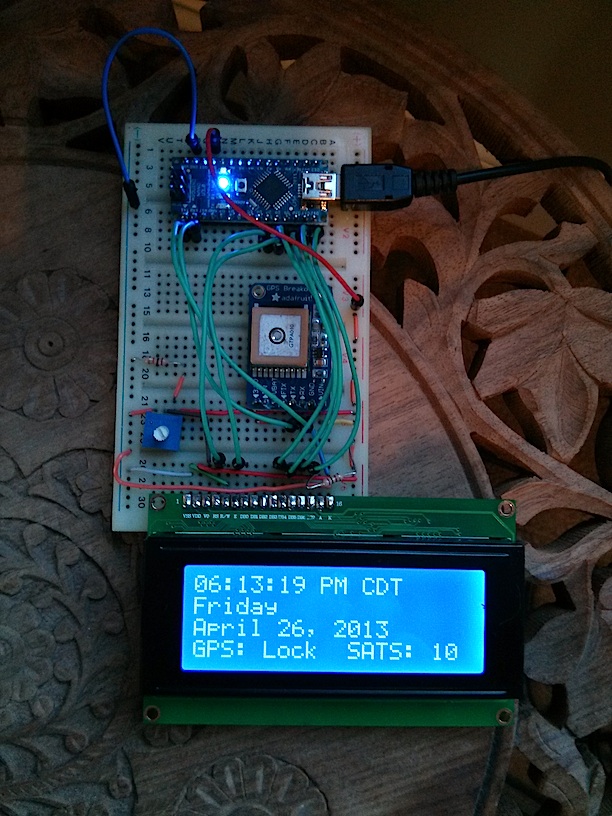
- The Arduino listens, via a serial connection, to the NMEA output of a GPS module.
- It then parses the raw NMEA data sentences to pull out information on:
- Current time,
- Current date,
- GPS Fix Status, and
- Number of satellites being used.
- Finally, it drives/updates an LCD to display that information.
If you look around, you’ll find that “laundry list” describes pretty much all of the arduino/GPS clock projects on the ‘net. But once I got all of that basic stuff working, I took a hard look at what I considered to be the biggest shortcoming of the “standard” clock design: they don’t display local time.
For the most part, these clocks simply act to monitor and display the information contained within the NMEA data output by the GPS module. Most of the time that means that the clock displays UTC time, rather than local time – so that was the first thing I fixed. Unfortunately, here in the U.S., transitioning the project to “local”; time also entails dealing with the problem of Daylight Saving Time (DST).
Note the timezone info…
My initial fix involved hardcoding a UTC offset into my clock code, and monitoring one of the arduino’s digital inputs as a mechanism for telling the clock that DST was in effect – i.e. by pulling one of the arduino’s input pins high (don’t worry if you don’t know, exactly, what that means – just figure that it means connecting a wire between two points in the circuit to tell the arduino to use DST).
Getting that working wasn’t too difficult, but the idea of changing around a jumper on the board to turn DST on and off seemed a little – well – wrong. So… that was the next place I turned my attention – and developed some code to automatically change between standard time and daylight saving time.
Despite the fact that accounting for Daylight Saving Time seems to trip up several OS manufacturers, altering the clock code to correct itself for DST really wasn’t incredibly hard. However, because the transitions to and from DST occur on non-fixed dates (DST starts on the second Sunday in March and ends on the first Sunday in November) we need a means of figuring out when specific days occur. All things considered, adding DST-handling to the clock code doesn’t turn out to be incredibly difficult.
Finally, I was terrifically bothered by the idea of hard-coding a UTC offset into the clock code to account for the local time zone. I could, of course, fall back to setting the local UTC offset using jumpers in the circuit – but once again, that just seems wrong. The local time zone is a function of your physical location… and the clock knows what your geographic coordinates are… Hmmm…
My final tweak is – if I do say so myself – pretty darned awesome: giving the clock the ability to figure out what time zone you’re in, based on GPS coordinates, to an amazingly accurate scale – it accurately calculates your local time zone for any location (within the continental United States) at a scale of less than two square miles.
So, what if you had a clock that would:
- Automatically set itself when you plugged it in?
- Corrected itself for Daylight Saving Time?
- Automatically set itself to the correct LOCAL time anywhere in the continental United States?
- And changed time zones (again, within the continental United States) on the fly if you took it with you on a trip?
What if you could build it yourself and actually understand the code that makes it work?
That’s the goal of this multi-part blog post: a thorough walk-through of building, wiring, and programing the Ultimate Arduino
GPS Clock.
Trust me: we’re going to go through this slowly, step-by-step, building our way up to the grand finale, but taking our time and making sure that you understand all of the stuff you’ll need to understand along the way.
NEXT UP: Bill of Materials!
Editor’s note: We continually hound Mr. Liston for additional updates, but perhaps his internal clock is off preventing him from responding.